A Modern Space Cadet
Posted on October 3rd, 2012.
I spend a lot of my time (easily over 8 hours a day) at a keyboard. As you might have guessed from my previous entries about Vim and Mutt I'm not averse to spending a few hours to improve an environment I'm going to be spending tens of thousands of hours in over the next few years, so it shouldn't be a shock that my keyboard is something I've heavily tweaked.
This post is about what I've done to make my typing experience more pleasant and efficient.
If you scoff at customization you won't enjoy this post. What if I have to use someone else's machine? I can count on one hand the number of times I've had to use someone else's machine ever since I got an iPhone five years ago. I like customizing my machine to save me time. Yes, there may be some excessive stuff here, but not only does it make me type faster, it's fun!
The Original
There have been many, many keyboards produced in the world since the first ones emerged. One of the most famous, at least in programming circles, is the Space Cadet Keyboard.
Originally used on Lisp machines and some other systems, it's not a keyboard for the minimalist. There are four "bucky keys" (modifier keys): control, meta, super, and hyper (plus shift, of course). There are also special keys that let you type Greek letters and mathematical symbols.
The Space Cadet is an example of a keyboard for someone not afraid to invest some time to work faster.
It's also absolutely gorgeous. The color scheme and typography is beautiful.
This is the keyboard I used (loosely) as inspiration when crafting my current setup.
Modern Hardware
I've tried a number of modern keyboards in the past few years. They're all high-quality and more expensive than the $20 plastic toys that come with desktops. But I spend 60 or more hours a week at a keyboard and maybe one hour a week in my car, so I'm getting pretty good use out of the dollars I've put into keyboards if you compare them to the cost of my car!
I'll go through the keyboards I've used in chronological order. I'm not going to write too much about the basics of mechanical keyboards and switches. If you want to learn about that, this post and this guide are good places to start.
Apple Wireless Keyboard
For a long time I used Apple wireless keyboards.
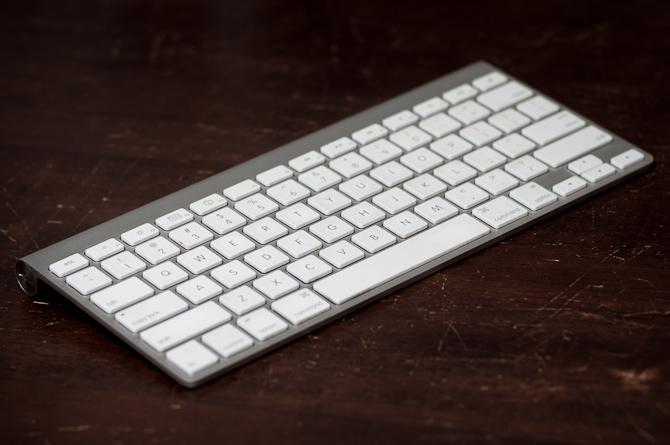
They're light and compact, but still feel extremely solid thanks to their metal construction.
They also stay really clean because there gaps between keys are tiny, instead of the funnel-shaped gaps of other keyboard that send dirt straight to the bottom.
They're readily available at any Apple store, and of course they're wireless which is great.
They also feel exactly like the keyboards on Apple's laptops, so your muscle memory is perfectly suited to either one if you switch between them often.
Unfortunately typing on them is nowhere near as nice as the rest of the keyboards in this list. Apple keyboards have (I think) only 2mm of travel, but you have to bottom-out the keys to register the keypresses.
Das Silent Ultimate
The first mechanical keyboard I got was the Das Silent Ultimate.
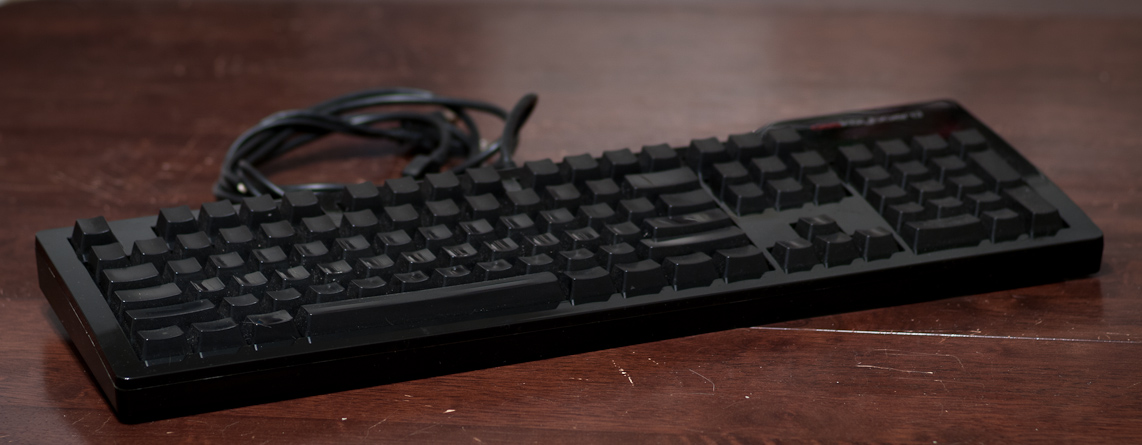
(This photo is actually my Das Clicky since I don't have the Silent any more, but they're exactly the same externally.)
Compared to the Apple keyboards the switches on the Das Silent (Cherry Brown switches) feel far softer. You're not smashing your fingers against metal on every keypress.
Overall the Das Silent isn't too bad. It's built like a tank so I have no doubt it'd last forever. It also has the option of blank keys, which I prefer.
I didn't stick with this keyboard for long. First, its glossy finish looks good when it's in the box and terrible forever after that. It's way too easy to get dirty.
Something also just feels "off" about the key switches to me, especially after I've tried the other boards in this list. They feel, for lack of a better term, "mushy" to me.
Das Clicky Ultimate
The next keyboard I tried was the Das Clicky Ultimate.
This is exactly the same as the Das Silent except for the switches, which are the "clicky" Cherry Blues. These feel way better to me than the browns. The mushiness I described for the Silent is completely gone.
They are not kidding when they say it is loud. If you're typing a lot expect to have a constant background noise of clicks. But to me the sound is soothing, especially once you get into a rhythm of typing for extended periods. Your coworkers might disagree, so tread carefully.
The Das Clicky still has that godawful glossy finish, unfortunately. After a while I decided to try out what I had heard people raving about: Topre switches.
Happy Hacking Keyboard Professional 2
The Happy Hacking Keyboard was my next keyboard. It's much more expensive than the Dases were, so it was a tough call, but I'm glad I got it.
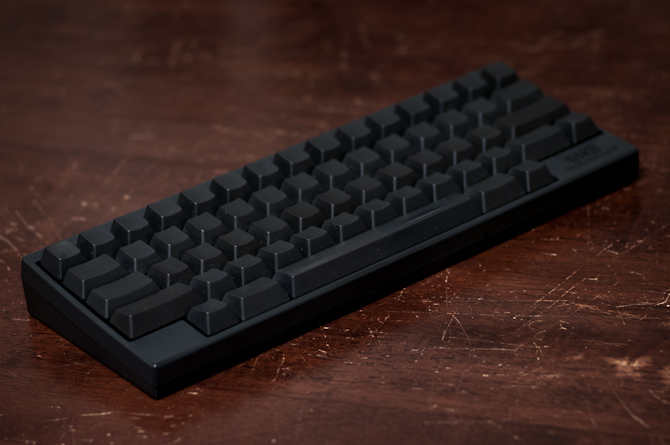
The HHKB uses Topre key switches, which to me feel like Cherry Browns done right. There's no "click" like the Blues, but instead of the mush of the Browns you get a satisfying "thunk" or "sshhhunk" on each press. It's a great balance: you have a nice satisfying sound that's less annoying for other people.
The finish on this keyboard is perfect. It is the most unassuming, elegant, wonderful matte finish I've seen on any keyboard. The plastic is just textured enough to feel solid under your fingers (not slippery like Macbook keys) but not enough to feel like you're typing on sandpaper.
If you're short on space, or want to carry your keyboard with you, the HHKB is for you. It's tiny, but still feels solid and not flimsy at all.
I have two main complaints about the HHKB. First, there's two spaces on the bottom row where they could have put a modifier key but didn't. The space on the right has the logo, which is fair enough, but the one on the left is simply blank for no good reason.
My other complaint is the idiotic default placement of the fn key and the
arrow keys. I don't mind having to use fn to get to the arrows as
a concession to a compact design, but why on earth would you place them so that
you have to chord on a single hand to hit them?
This problem would be completely solved if the fn key were moved from its
current position (right of the right shift key) down to the empty lower-left
corner. Then you could use your left hand to hold fn while your right worked
the arrow keys, no single-hand contortion required.
So after a while with the HHKB I got sick of the arrow key problem. I loved the Topre switches though, so the next choice was pretty obvious.
Topre Realforce 103
The Topre Realforce 103UB was my next keyboard, and is the one I'm still using to this day.
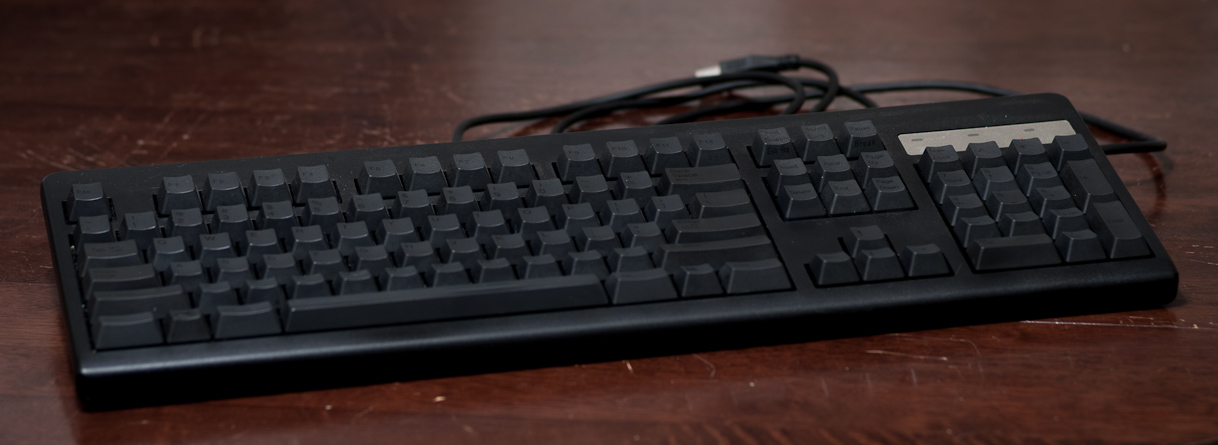
I believe the model I bought is now discontinued, but it's been replaced by the 104UB which is exactly the same except for an extra key on the right side. If I could swap my current keyboard for one of those I would. In fact, if anyone wants to buy my used 103UB for a bit of a discount I'd be totally willing to sell it to get the 104UB.
Anyway, this keyboard has a few disadvantages. First, unlike every other keyboard here (except the wireless Apple ones) it is not a USB hub. This isn't a huge deal (I have external USB hubs), but it did come as a big surprise.
Second, it's big. Really big. If you don't have plenty of room on your desk you might want to look at the tenkeyless varieties which ditch the number pad section to save space. I have room and I love having a number pad, so I got the behemoth-sized model.
Also for some reason I can't fathom there's no way to get blank, black keycaps for this keyboard. You can get blank Topre keycaps in lime green, pink, yellow, and lots of other colors, but not a simple black!
Now for the good parts. This thing is built like a tank. If you needed to defend your home from an intruder, it would make an acceptable blunt weapon with which to do so (and you'd probably be able to plug it right back in and start typing again).
The finish is the same as on the HHKB (gorgeous), but I have to take a point off for the non-blank keycaps. I don't need to look at the keys while I type, so why marr the luxurious finish with lettering?
The Realforce also uses Topre switches, but it has another trick up its sleeve that makes typing on it even nicer than the HHKB. The version I have is the "variable-weighted" one, which means that the keys under your weaker fingers take less force to press than the ones under your stronger fingers. This is fantastic for long sessions of typing. Instead of my pinkies getting tired my fingers seem to all tire out at the same rate now. Topre does make a "uniform" version that doesn't have this trick, but I really like variable weight keys myself.
Verdict
Right now I'm using the Topre Realforce for my day to day work. I've fallen in love with how the Topre switches feel (I prefer them over all the others except maybe the Cherry Blues for the sound) and the Happy Hacking Keyboard is just too cramped. If I were short on space the HHKB would be great, but I have plenty of room on my desk, so why not make use of it?
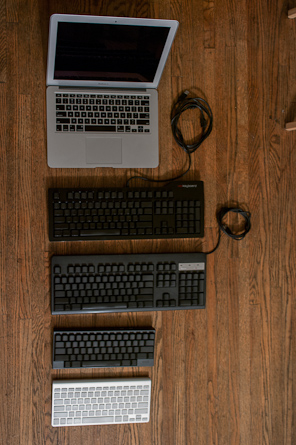
Here's a photo of all the keyboards (along with a 13" Macbook Air) so you can see the differences in size.
Modern Software
Now that I've talked about the hardware it's time for the software. I use OS X exclusively, so everything I say here is OS X specific. I'm sure there are Windows and Linux equivalents somewhere though.
I use three software programs that, together, give me just about unlimited flexibility in customizing how my keyboard works in OS X.
Keyboard Maestro
Keyboard Maestro is a utility for binding macros to keyboard shortcuts in OS X. It may not have the best user interface, but it can do a lot, and once you set up your shortcuts you never have to look at it again. It's $36.
Right now I use it for application switching, with a few twists I'll cover later on.
I switched to Keymando for a while. It was great being able to configure it in a programming language with a plain text file I could easily work with in version control, but compared to Keyboard Maestro it's far slower and far buggier. I'm now back to only using Keyboard Maestro.
PCKeyboardHack
PCKeyboardHack lets you map one key on your keyboard to another at a very
low level. For example, you can change just the right Option key to send F19
instead. I use this for one single key which you'll see in the next section.
It's free and open source.
KeyRemap4MacBook
KeyRemap4MacBook is how I do the bulk of my keyboard customizations. Like all of the other applications its user interface is horrible, but it can do damn near anything you might want. You could probably replace Keyboard Maestro with it, at least for the kind of stuff I do. It's also free and open source.
The bulk of what I describe in this post is going to use KeyRemap4MacBook. I'm not going to give you a tutorial in it here — read its documentation if you want to learn how to use the things I'm going to show.
Control/Escape
These first few mappings aren't directly from the Space Cadet keyboard, but they were inspired by its spirit of making an efficient tool for text editing.
The Capslock key on modern keyboard has become the punchline of many a joke, and for good reason: there's no reason to dedicate such an important key to a function like capslock. Many people rebind it to a more useful key like Control, Option, Escape, or Backspace. I rebound it to Control for a while and then realized that with KeyRemap4MacBook I could get even more mileage out of it.
The important thing I thought of one day is that it's possible to divide keys on the keyboard into three groups:
- Keys you hold down to change how other keys behave, but that (usually) don't do anything if you use them on their own (like Shift and Control).
- Keys that you press and release but don't want to "repeat" as you hold them (like Escape or Insert).
- Keys that you sometimes press and release, but sometimes want to repeat (like holding Space to insert a bunch of spaces, or Backspace to kill a bunch of characters).
Can you see where this is heading? The last group is pretty normal, but the first two groups are special. Specifically: there are two different ways to use them and they're each only useful in one of those ways.
This means that we can combine them onto a single key without losing any useful functionality!
I'm clearly not the first one to think of this, because KR4MB includes built-in support for creating these kinds of mappings.
First I've mapped Capslock to Control at the OS X level by going into the Keyboard preference pane in System Preferences, clicking the Modifier Keys button in the lower right, selecting the keyboard in the dropdown list (this is surprisingly easy to miss), and changing the Capslock setting:
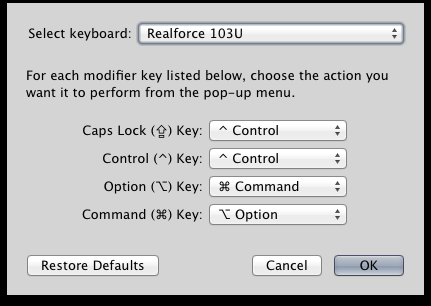
Then I've selected the following premade option in KeyRemap4MacBook:
Control_L to Control_L
(+ when you type Control_L only, send Escape)
Now the Capslock key on the keyboard does the following:
- If held down and pressed with another key, it acts like Control.
- If pressed and released on its own, it acts like Escape.
That's two extremely important keys (at least for Vim users) on a single key in one of the prime locations on the keyboard! No more awkward stretches!
If you try this and want to force yourself to learn to use it, disable the normal escape key. You'll learn fast.
Update: I forgot to mention that if you use this (and the Shift improvements below) you'll probably want to change the "[Key Overlaid Modifier] Timeout" setting in the KR4MB preferences:
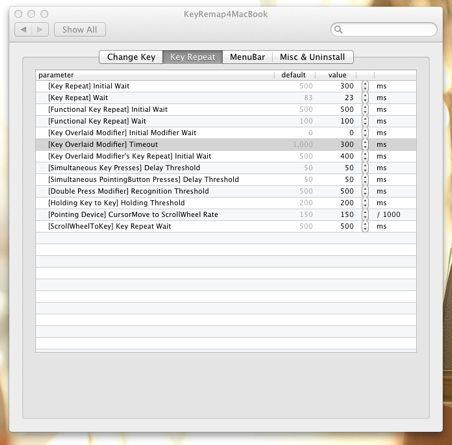
This setting controls the maximum length of a keypress that will register as "single press". It's easier to understand with an example. The default is 1000ms, which means that if you press and hold the Capslock key for 900ms and release it, it will count as Escape. If you hold it for 1001ms before releasing, it counts as pressing and releasing Control instead.
If you're finding that you're sometimes holding Control out of habit and then releasing it, but it's still firing as an Escape, you may want to turn this setting down to a lower value. I have mine set to 300ms.
This is a lot more noticeable with the Shift mappings I'll describe shortly, so keep it in the back of your mind if you try those out.
Hyper
Modern OS X supports four "modifier" keys: Control, Option, Command, and Shift. The Space Cadet keyboard had five: Control, Meta, Super, Hyper, and Shift.
Shift and Control map to each other, and OS X's Option key is pretty much the same as Meta (in fact I think Emacs users usually use Alt as Meta). I arbitrarily decided that Command was the OS X equivalent of Super. That left Hyper.
Since OS X doesn't natively support a fifth modifier key I had to come up with a way to fake it.
First, I realized that because I use Capslock for Control I had no use for the real left Control key. So the first step was to remap that to something else distinct from the Capslock-version of Control.
This required PCKeyboardHack. I don't think there's a way to do it in
KeyRemap4MacBook, because by the time KR4MB sees the keypress it can't tell if
it came from the Capslock key or the real Control key (due to how they were
changed in the previous section). PCKeyboardHack, however, can, so I remapped
left Control to keycode 80:
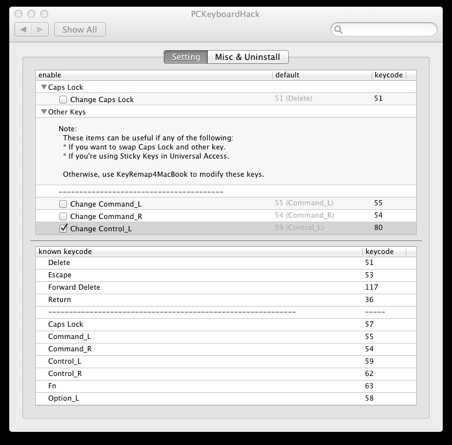
Keycode 80 is the F19 key. My keyboard doesn't have an F19 key so it
doesn't conflict with anything. Now I can simply remap F19 in KR4MB just like
any other key.
To create a "pseudo-Hyper" modifier, I remapped this key to be the equivalent of
holding down all four other modifiers by adding the following to my
private.xml KR4MB configuration file:
<item>
    <name>Remap Left Control to Hyper</name>
    <appendix>OS X doesn't have a Hyper. This maps Left Control to Control + Shift + Option + Command.</appendix>

    <identifier>space_cadet.left_control_to_hyper</identifier>

    <autogen>
        --KeyToKey--
        KeyCode::F19,

        KeyCode::COMMAND_L,
        ModifierFlag::OPTION_L | ModifierFlag::SHIFT_L | ModifierFlag::CONTROL_L
    </autogen>
</item>
As far as I can tell, no keyboard shortcuts in OS X or any apps use all four modifier keys (how would you normally press them all, anyway?). But many programs, like Keyboard Maestro, let you define your own shortcuts. So now I've got an entire key as a "namespace" all to myself for my own shortcuts!
This is really nice. I don't have to worry about "shadowing" existing shortcuts anywhere and it's only a single modifier to press.
Currently I use this "namespace" for application switching. Instead of using
the normal Command-Tab switcher, I have shortcuts for each individual app
I use frequently. For example, Hyper-k switches to Firefox, Hyper-y
switches to Twitter, and so on. This is better than Command-Tabing because
I don't have to worry about how many times I need to press it. Hyper-k
always goes to Firefox no matter what, so I can easily burn that into my
muscle memory.
There's one more little trick I use in Keyboard Maestro. It's specific to how I work, but I'm sure some of you will still find it handy.
I pretty much always keep two iTerm 2 windows open. The first contains a tmux session with one window split into two panes. One pane holds weechat for IRC, the other holds Mutt for email. I keep this on my laptop screen at all times while I do other things on my external monitor.
The second iTerm window is almost always fullscreened, and contains a tmux session with whatever I'm working on. The number of windows and panes varies wildly.
What I wanted was a way to bind Hyper-i and Hyper-m to directly focus my IRC
and mail panes, and Hyper-j to directly focus the second, "general-purpose"
iTerm window.
The solution came in two parts. First I configured tmux so that prefix N
would select the nth pane in the current window by adding the following to
~/.tmux.conf:
bind 1 select-pane -t 1
bind 2 select-pane -t 2
bind 3 select-pane -t 3
bind 4 select-pane -t 4
bind 5 select-pane -t 5
bind 6 select-pane -t 6
bind 7 select-pane -t 7
bind 8 select-pane -t 8
bind 9 select-pane -t 9
My tmux prefix is Control-f, so now pressing Control-f 1 will go to pane 1,
and so on. Then I configured Keyboard Maestro like so:
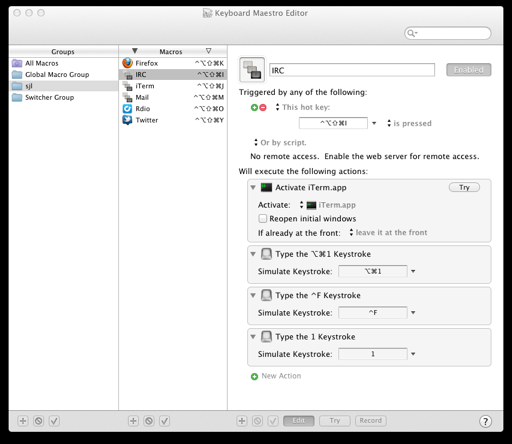
This binds Control-Shift-Option-Command-i (which is just Hyper-i) to do the
following:
- Focus iTerm 2.
- Send a
Command-Option-1keystroke, which will focus the first iTerm 2 window (I simply make sure I always open my mail/irc window first). - Send the
Control-fkeystroke. - Send the
1keystroke, which together with the previous one tells tmux to switch to pane 1.
The mail shortcut is similar, of course, and the general-purpose terminal one is even simpler.
So now I've got a free modifier key that won't conflict with anything, and I've got some very easy-to-type shortcuts I can burn into my fingers for switching applications quickly. Awesome.
Better Shifting
The Shift keys are another of those keys that are only useful with other keys, so it's only natural that they were also on the list of keys to optimize. First, however, I took a detour to correct a bad habit of mine.
Shift Key Training Wheels
I've been typing for most of my life, but I never really learned to do it correctly. I can touch type, of course, but sometimes I use the wrong fingers for certain keys.
My most egregious offense was that I always used the left Shift key. Even when
typing X I'd hold the left Shift key with my left pinky and hit the x with
my left index finger, which pulled my hand off the home row and generally felt
awkward.
One day I decided I was tired of doing this the wrong way and resolved to fix myself. The easiest way to break a bad habit is to make it harder or impossible to do, so I created a custom KeyRemap4MacBook setting that disables the keypress when you use the incorrect Shift key with a letter. Here it is in full:
<item>
    <name>Use the correct shift keys.</name>
    <identifier>private.correct_shift_keys</identifier>

    <autogen>--KeyToKey-- KeyCode::Q, ModifierFlag::SHIFT_L, KeyCode::VK_NONE</autogen>
    <autogen>--KeyToKey-- KeyCode::W, ModifierFlag::SHIFT_L, KeyCode::VK_NONE</autogen>
    <autogen>--KeyToKey-- KeyCode::E, ModifierFlag::SHIFT_L, KeyCode::VK_NONE</autogen>
    <autogen>--KeyToKey-- KeyCode::R, ModifierFlag::SHIFT_L, KeyCode::VK_NONE</autogen>
    <autogen>--KeyToKey-- KeyCode::T, ModifierFlag::SHIFT_L, KeyCode::VK_NONE</autogen>
    <autogen>--KeyToKey-- KeyCode::A, ModifierFlag::SHIFT_L, KeyCode::VK_NONE</autogen>
    <autogen>--KeyToKey-- KeyCode::S, ModifierFlag::SHIFT_L, KeyCode::VK_NONE</autogen>
    <autogen>--KeyToKey-- KeyCode::D, ModifierFlag::SHIFT_L, KeyCode::VK_NONE</autogen>
    <autogen>--KeyToKey-- KeyCode::F, ModifierFlag::SHIFT_L, KeyCode::VK_NONE</autogen>
    <autogen>--KeyToKey-- KeyCode::G, ModifierFlag::SHIFT_L, KeyCode::VK_NONE</autogen>
    <autogen>--KeyToKey-- KeyCode::Z, ModifierFlag::SHIFT_L, KeyCode::VK_NONE</autogen>
    <autogen>--KeyToKey-- KeyCode::X, ModifierFlag::SHIFT_L, KeyCode::VK_NONE</autogen>
    <autogen>--KeyToKey-- KeyCode::C, ModifierFlag::SHIFT_L, KeyCode::VK_NONE</autogen>
    <autogen>--KeyToKey-- KeyCode::V, ModifierFlag::SHIFT_L, KeyCode::VK_NONE</autogen>

    <autogen>--KeyToKey-- KeyCode::Y,         ModifierFlag::SHIFT_R, KeyCode::VK_NONE</autogen>
    <autogen>--KeyToKey-- KeyCode::U,         ModifierFlag::SHIFT_R, KeyCode::VK_NONE</autogen>
    <autogen>--KeyToKey-- KeyCode::I,         ModifierFlag::SHIFT_R, KeyCode::VK_NONE</autogen>
    <autogen>--KeyToKey-- KeyCode::O,         ModifierFlag::SHIFT_R, KeyCode::VK_NONE</autogen>
    <autogen>--KeyToKey-- KeyCode::P,         ModifierFlag::SHIFT_R, KeyCode::VK_NONE</autogen>
    <autogen>--KeyToKey-- KeyCode::H,         ModifierFlag::SHIFT_R, KeyCode::VK_NONE</autogen>
    <autogen>--KeyToKey-- KeyCode::J,         ModifierFlag::SHIFT_R, KeyCode::VK_NONE</autogen>
    <autogen>--KeyToKey-- KeyCode::K,         ModifierFlag::SHIFT_R, KeyCode::VK_NONE</autogen>
    <autogen>--KeyToKey-- KeyCode::L,         ModifierFlag::SHIFT_R, KeyCode::VK_NONE</autogen>
    <autogen>--KeyToKey-- KeyCode::SEMICOLON, ModifierFlag::SHIFT_R, KeyCode::VK_NONE</autogen>
    <autogen>--KeyToKey-- KeyCode::N,         ModifierFlag::SHIFT_R, KeyCode::VK_NONE</autogen>
    <autogen>--KeyToKey-- KeyCode::M,         ModifierFlag::SHIFT_R, KeyCode::VK_NONE</autogen>
    <autogen>--KeyToKey-- KeyCode::COMMA,     ModifierFlag::SHIFT_R, KeyCode::VK_NONE</autogen>
    <autogen>--KeyToKey-- KeyCode::DOT,       ModifierFlag::SHIFT_R, KeyCode::VK_NONE</autogen>
    <autogen>--KeyToKey-- KeyCode::QUOTE,     ModifierFlag::SHIFT_R, KeyCode::VK_NONE</autogen>
</item>
It took me about four hours of normal computer use to unlearn over two decades of wrong typing. It's amazing how fast muscle memory can adjust when you simply force it to.
Once I fixed myself I disabled this setting, because it also makes you to use the "correct" Shift key when doing keyboard shortcuts, and sometimes those are easer to do with the "wrong" Shift.
If you only use one Shift key I'd really encourage you to try this. It spreads out the wear over both pinkies and feels much better. Your hands will thank you.
Shift Parentheses
Now that I was using the right Shift keys, it was time to revisit mapping something else onto them. One pair of keys stood out as a perfect candidate: the left and right parentheses.
Parentheses are common in most of the programming languages in use today (some
more than others). If you counted I bet you'd find them more common than square
or curly brackets in the majority of your code, and yet they're shoved away in
the horrible homes of Shift-9 and Shift-0.
I decided to try out remapping my Shift keys to work like so:
- When held while pressing other keys, act like Shift.
- When pressed and released on their own, type an opening or closing parenthesis (left and right shift respectively).
This means I can type parentheses with a single, unchorded keypress. After using it for a while I absolutely love it. Here's the KeyRemap4MacBook setting for it:
<item>
    <name>Shifts to Parentheses</name>
    <appendix>Shifts, when pressed alone, type parentheses.  When used with other keys they're normal shifts.</appendix>

    <identifier>private.shifts_to_parens</identifier>

    <!-- This is the basic mapping. -->
    <autogen>--KeyOverlaidModifier-- KeyCode::SHIFT_R, ModifierFlag::SHIFT_R | ModifierFlag::NONE, KeyCode::SHIFT_R, KeyCode::KEY_0, ModifierFlag::SHIFT_L</autogen>
    <autogen>--KeyOverlaidModifier-- KeyCode::SHIFT_L, ModifierFlag::SHIFT_L | ModifierFlag::NONE, KeyCode::SHIFT_L, KeyCode::KEY_9, ModifierFlag::SHIFT_R</autogen>

    <!--
        Remap the "rolls" of () and )( because it's too easy to hit one
        before finishing the other, and there's no other reason to be
        pressing both shift keys at once anyway
    -->
    <autogen>--KeyToKey-- KeyCode::SHIFT_L, ModifierFlag::SHIFT_R, KeyCode::KEY_0, ModifierFlag::SHIFT_L, KeyCode::KEY_9, ModifierFlag::SHIFT_L</autogen>
    <autogen>--KeyToKey-- KeyCode::SHIFT_R, ModifierFlag::SHIFT_L, KeyCode::KEY_9, ModifierFlag::SHIFT_L, KeyCode::KEY_0, ModifierFlag::SHIFT_L</autogen>

    <!--
        Remap Rshift+Space to ') ', because when typing an end paren and
        then a space I tend to hit space before I let go of rshift.
    -->
    <autogen>--KeyToKey-- KeyCode::SPACE, ModifierFlag::SHIFT_R, KeyCode::KEY_0, ModifierFlag::SHIFT_L, KeyCode::SPACE</autogen>
</item>
As you can see there's actually a bit more to the mapping, because I was finding some minor usability glitches in the bare setting.
Occasionally I'll accidentally type a parenthesis when meaning to do something else, but it happens so infrequently and the benefits are so great that I'd absolutely recommend this to anyone who programs a lot.
Key Layers
Now we're getting to things that are directly inspired by the Space Cadet keyboard. If you don't type a lot of mathematical characters you may not want to bother with these, but since I've been taking the Introduction to Mathematical Thinking class on Coursera these bindings have made it very pleasant to type out my homework.
Greek
The Space Cadet had a separate key for typing Greek letters, and I've decided to do the same. I don't know exactly how that modifier key worked, but here's how my version works:
- Press and release the "Greek" key to go into "Greek mode" for one character.
- Type the appropriate Latin letter to get the Greek character for that key (capital letters and lowercase are distinct).
For example, typing Greek, then w results in ω (omega), while Greek, then
W results in Ω (capital omega).
If you want to actually type out full Greek words, this isn't ideal because you
have to press the Greek key between every letter. But for my purposes
(variables in math) it's perfect.
There are two parts to implementing this in KeyRemap4MacBook. First I needed to
pick a Greek key. I never use the Command, Option, and Control keys to the
right of Space (another bad habit I should probably fix one day), so I chose the
right Option key for this.
If you do use the modifiers on the right you might prefer to pick a different
key for this, like Insert or Print Screen.
Also, since I'm using the Realforce which is a PC keyboard, that key is actually
called the PC Application key. I'm sure you can figure out how to adjust the
mapping if necessary.
Here's the first part of the mapping, which binds the Greek key:
<item>
    <name>Greek Layer</name>
    <appendix>Right PC Application key activates the Greek key layer.</appendix>

    <identifier>space_cadet.greek_layer</identifier>

    <autogen>
        --KeyToKey--
        KeyCode::PC_APPLICATION,
        KeyCode::VK_STICKY_EXTRA4
    </autogen>
I use the virtual modifier key EXTRA4. This key is only intelligible inside
of KR4MB, but that's not a problem since I do all of the rest of the Greek
mapping inside there too.
I wrote a little Python script to generate the rest of the mapping for me. Here's the Greek layer mapping in its entirety: https://gist.github.com/3824106
What are all those Option modifiers doing in there? Well there's one more
step to making this work. In order to use this mapping you need to switch your
keyboard layout in OS X to the "Unicode Hex Input" layout under System
Preferences → Language and Text → Input Sources:
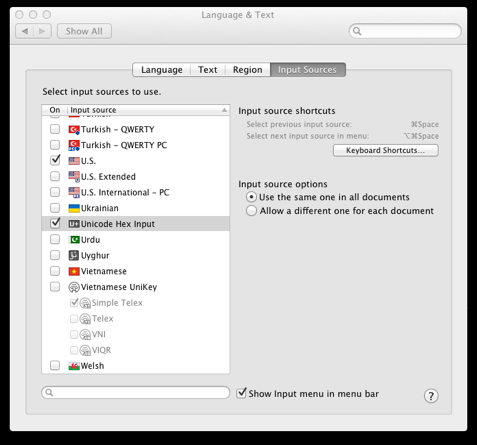
As far as I can tell this is exactly like QWERTY except that it also allows you
to type in Unicode characters directly by holding Option and typing in their
Unicode code point's hex value. That's how the mapping inserts the Unicode
characters for the Greek letters.
If you want to do this with another keyboard layout I'm not sure how you could do it. If you find a way let me know and I'll post it here.
However, there's a problem. The Unicode Hex Input keyboard layout disables OS
X's Option-Left and Option-Right keyboard shortcuts for some reason I don't
even want to try to guess. Luckily they can be restored with another mapping:
<item>
    <name>Restore [Shift-]Opt-(Left/Right)</name>
    <appendix>The Unicode Hex Input keyboard layout disables these keys for some reason.</appendix>

    <identifier>space_cadet.fix_opt_arrows</identifier>

    <autogen>
        --KeyToKey--
        KeyCode::CURSOR_LEFT, VK_OPTION | VK_SHIFT,

        KeyCode::B,
        ModifierFlag::OPTION_L | ModifierFlag::SHIFT_L | ModifierFlag::CONTROL_L
    </autogen>
    <autogen>
        --KeyToKey--
        KeyCode::CURSOR_LEFT, VK_OPTION,

        KeyCode::B,
        ModifierFlag::OPTION_L | ModifierFlag::CONTROL_L
    </autogen>
    <autogen>
        --KeyToKey--
        KeyCode::CURSOR_RIGHT, VK_OPTION | VK_SHIFT,

        KeyCode::F,
        ModifierFlag::OPTION_L | ModifierFlag::SHIFT_L | ModifierFlag::CONTROL_L
    </autogen>
    <autogen>
        --KeyToKey--
        KeyCode::CURSOR_RIGHT, VK_OPTION,

        KeyCode::F,
        ModifierFlag::OPTION_L | ModifierFlag::CONTROL_L
    </autogen>
</item>
Option-Delete is also broken by Unicode Hex Input. I haven't figured out how
to fix this, but I don't really care about it because I have the following in my
~/Library/KeyBindings/DefaultKeyBinding.dict file which lets me use
Control-w just like at the command line:
{
    "^w"="deleteWordBackward:";
}
Welcome to the fiddly rabbit hole of keybinding customization!
The Greek layer in my mapping pretty much matches the original Space Cadet mapping as far as I can tell. Here's a table of the keys and their Greek counterparts:
| Key | Alone | Shifted | Notes |
|---|---|---|---|
| a | α | Α | Alpha |
| b | β | Β | Beta |
| c | χ | Χ | Chi |
| d | δ | Δ | Delta |
| e | ε | Ε | Epsilon |
| f | φ | Φ | Phi (p was taken and the ph sounds like an f) |
| g | γ | Γ | Gamma |
| h | η | Η | Eta |
| i | ι | Ι | Iota |
| j | ϑ | Θ | Theta (with one of the lowercase variants) |
| k | κ | Κ | Kappa |
| l | λ | Λ | Lambda (Lisp users rejoice!) |
| m | μ | Μ | Mu |
| n | ν | Ν | Nu |
| o | ο | Ο | Omicron |
| p | π | Π | Pi |
| q | θ | Θ | Theta (with the other lowercase variant) |
| r | ρ | Ρ | Rho |
| s | σ | Σ | Sigma (with one of the lowercase variants) |
| t | τ | Τ | Tau |
| u | υ | Υ | Upsilon |
| v | ς | Σ | Sigma (with the other lowercase variant) |
| w | ω | Ω | Omega (o was taken and the lowercase kind of looks like a w) |
| x | ξ | Ξ | Xi |
| y | ψ | Ψ | Psi (p was taken and it looks a bit like a y) |
| z | ζ | Ζ | Zeta |
Math
The Space Cadet also had a Top key for typing the symbols on the top of the
keys, which were (I think) used in APL. I don't use APL, but when typing out
mathematical text it would be nice to have some symbols easily available.
I've added a Math layer that functions similarly to the Greek layer. I chose
the right Control key to activate it. I won't go into detail about how it
works because it's the same as the Greek layer. Here's the code for it if you
want to use it yourself: https://gist.github.com/3824109
I've currently only filled in the Math layer with keys I find useful, so there are a lot of empty keys at the moment. I plan to add new ones as I discover I want them.
| Key | Alone | Shifted | Notes |
|---|---|---|---|
| a | ∧ | ℵ | And, Aleph |
| b | |||
| c | ∘ | ℂ | Composition, Complex numbers |
| d | |||
| e | ∈ | ∉ | Element of, Not element of |
| f | ∫ | Integral (i was taken and it looks like an f) | |
| g | |||
| h | |||
| i | ∩ | ∞ | Intersection, Infinity |
| j | |||
| k | |||
| l | |||
| m | |||
| n | ℕ | Natural numbers | |
| o | ∨ | Or | |
| p | |||
| q | |||
| r | √ | ℝ | Root, Real numbers |
| s | |||
| t | |||
| u | ∪ | Union | |
| v | |||
| w | |||
| x | ⊻ | Xor | |
| y | |||
| z | ℤ | Integers | |
| - | ¬ | Not (looks like a minus) | |
| = | ≠ | ± | Not equal, Plus or minus (Shift-= is normally +) |
| / | ÷ | Division | |
| , | ≤ | Less than or equal to (Shift-, is normally <) |
|
| . | ≥ | Greater than or equal to (Shift-. is normally >) |
|
| 1 | |||
| 2 | |||
| 3 | |||
| 4 | |||
| 5 | |||
| 6 | |||
| 7 | |||
| 8 | × | Times or cross product (Shift-8 is normally *) |
|
| 9 | |||
| 0 | ∅ | Null set | |
| ` | ≈ | Approximately equal to (Shift-` is normally ~) |
|
| [ | ⊂ | ⊄ | Proper subset of, Not proper subset of |
| ] | ⊃ | ⊅ | Proper superset of, Not proper superset of |
| Left | ← | ↚ | |
| Right | → | ↛ | |
| Up/Down | ↔ | ↮ |
In addition, the last five rows also support the Control key for more
variants:
| Key | Ctrl | Ctrl-Shifted | Notes |
|---|---|---|---|
| [ | ⊆ | ⊈ | Subset of, Not subset of |
| ] | ⊇ | ⊉ | Superset of, Not superset of |
| Left | ⇐ | ⇍ | |
| Right | ⇒ | ⇏ | |
| Up/Down | ⇔ | ⇎ |
Conclusion
If you want my full KeyRemap4MacBook configuration you can always get the latest version from my dotfiles.
I've done some crazy, fiddly things to my machine. Undoubtedly lots of people on Hacker News will scoff and brag about how they only use the defaults. I don't really care. Given that I spend 60 hours or more a week at the keyboard if these things only save me 0.01% of my time they'll pay for themselves in a year or two. Not to mention all the finger pain they'll prevent. Plus, tinkering around and seeing how far you can push things is fun (sometimes)!
I'm pretty satisfied with my hardware and layout. My dream would be to get a custom keycap set with my key labels and the Space Cadet colors/typography that would fit on a white Realforce. It would be absolutely beautiful, but I'm sure it'd be far too expensive to make a single custom set. Oh well, maybe some day!