A Guide to Branching in Mercurial
Posted on August 30th, 2009.
I've been hanging out in the #mercurial and #bitbucket channels on freenode a lot lately, and I've noticed a topic that comes up a lot is "how does Mercurial's branching differ from git's branching?"
A while ago Nick Quaranto and I were talking about Mercurial and git's branching models on Twitter and I wrote out a quick longreply about the main differences. Since then I've pointed some git users toward that post and they seemed to like it, so I figured I'd turn it into something a bit more detailed.
Disclaimer: this post is not intended to be a guide to the commands used for working with Mercurial. It is only meant to be a guide to the concepts behind the branching models. For more information on daily use and commands, the hg book is a great resource (if you find it useful, please buy a paper copy to support Bryan and have a printed copy of the best editing fail of all time).
- Prologue
- Branching with Clones
- Branching with Bookmarks
- Branching with Named Branches
- Branching Anonymously
- One More Difference Between Mercurial and git
- Conclusion
Prologue
Before I start explaining the different branching models, here's a simple repository I'll use as an example:
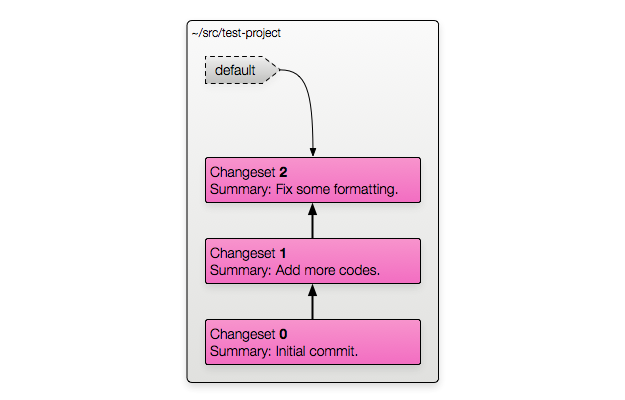
The repository is in the ~/src/test-project folder. It has three changesets
in it: numbers 0, 1 and 2.
For git users: each changeset in a Mercurial repository has a hash as an identifier, just like with git. However, Mercurial also assigns numbers to each changeset in a repository. The numbers are only for that local repository — two clones might have different numbers assigned to different changesets depending on the order of pulls/pushes/etc. They're just there for convenience while you're working with a repository.
The default branch name in Mercurial is "default". Don't worry about what that
means for now, we'll get to it. I'm mentioning it because there's a little
default marker in the diagram.
In all of these diagrams, a marker like that with a dashed border doesn't actually exist as an object anywhere. Those are special names that you can use to identify a changeset instead of the hash or number — Mercurial will calculate the revision on the fly.
For now, ignore the default marker. I've colored it grey in each of the
diagrams where it doesn't matter.
Branching with Clones
The slowest, safest way to create a branch with Mercurial is to make a new clone of the repository:
$ cd ~/src
$ hg clone test-project test-project-feature-branch
Now you've got two copies of the repository. You can commit separately in each one and push/pull changesets between them as often as you like. Once you've made some changes in each one, the result might look like this:
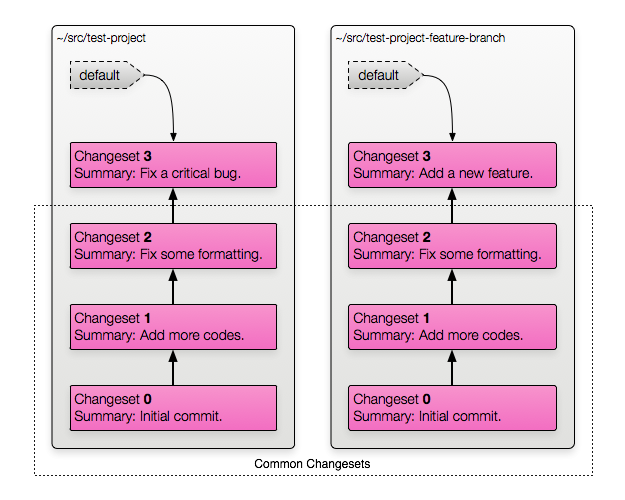
We've got two copies of the repository. Both contain the changesets that
existed at the time we branched/cloned. If we push from test-project into
test-project-feature-branch the "Fix a critical bug" changeset will be
pushed over.
For git users: Remember how I mentioned that the changeset numbers are local to a repository? We can see this clearly here — there are two different changesets with the number 3. The numbers are only used while working inside a single repository. For pushing, pulling, or talking to other people you should use the hashes.
Advantages
Cloning is a very safe way of creating a branch. The two repositories are completely isolated until you push or pull, so there's no danger of breaking anything in one branch when you're working in another.
Discarding a branch you don't want any more is very easy with cloned
branches. It's as simple as rm -rf test-project-feature-branch. There's no
need to mess around with editing repository history, you just delete the damn
thing.
Disadvantages
Creating a branch by cloning locally is slower than the other methods, though Mercurial will use hardlinks when cloning if your OS supports them (most do) so it won't be too slow.
However, the clone branching method can really slow things down when other
developers (not located nearby) want to work on the project. If you publish
two branches as separate repositories (such as stable and version-2),
contributors will have to clone down both repositories through the internet
if they want to work on both branches. That can take a lot of extra time,
depending on the repository size and bandwidth.
It can become especially wasteful if, for example, there are 10,000 changesets before the branch point and maybe 100 per branch after. Instead of pulling down 10,200 changesets you need to pull down 20,200. If you want to work on three different branches, you're pulling down 30,300 instead of 10,300.
There is a way to avoid this large download cost, as pointed out by Guido Ostkamp and timeless_mbp in #mercurial. The idea is that you clone one branch down from the server, then pull all the branches into it, then clone locally to split that repository back into branches. This avoids the cost of cloning down the same changesets over and over.
An example of this method with three branches would look something like this:
$ hg clone http://server/project-main project
$ cd project
$ hg pull http://server/project-branch1
$ hg pull http://server/project-branch2
$ cd ..
$ hg clone project project-main --rev [head of mainline branch]
$ hg clone project project-branch1 --rev [head of branch1]
$ hg clone project project-branch2 --rev [head of branch2]
$ rm -rf project
$ cd project-main
$ [edit .hg/hgrc file to make the default path http://server/project-main]
$ cd ../project-branch1
$ [edit .hg/hgrc to make the default path http://server/project-branch1]
$ cd ../project-branch2
$ [edit .hg/hgrc to make the default path http://server/project-branch2]
This example assumes you know the IDs of the branch heads off the top of your head, which you probably don't. You'll have to look them up.
It also assumes that there is only one new head per branch, when there might
be more. If branch1 has two heads which are not in mainline, you would
need to look up the IDs of both and specify both in the clone command.
Another annoyance shows up when you're working on a project that relies on your code being at a specific file path. If you branch by cloning you'll need to rename directories (or change the file path configuration) every time you want to switch branches. This might not be a common situation (most build tools don't care about the absolute path to the code) but it does appear now and then.
I personally don't like this method and don't use it. Others do though, so it's good to understand it (Mercurial itself uses this model).
Comparison to git
Git can use this method of branching too, although I don't see it very often. Technically this is the exact same thing as creating a fork on GitHub, but most people think of "fork" and "branch" as separate concepts.
Branching with Bookmarks
The next way to branch is to use a bookmark. For example:
$ cd ~/src/test-project
$ hg bookmark main
$ hg bookmark feature
Now you've got two bookmarks (essentially a tag) for your two branches at the current changeset.
To switch to one of these branches you can use hg update feature to update
to the tip changeset of that branch and mark yourself as working on that
branch. When you commit, it will move the bookmark to the newly created
changeset.
Note: for more detailed information on actually using bookmarks day-to-day please read the bookmarks page. This guide is meant to show the different branching models, and bookmarks have a few quirks that you should know about if you're going to use them.
Here's what the repository would look like with this method:
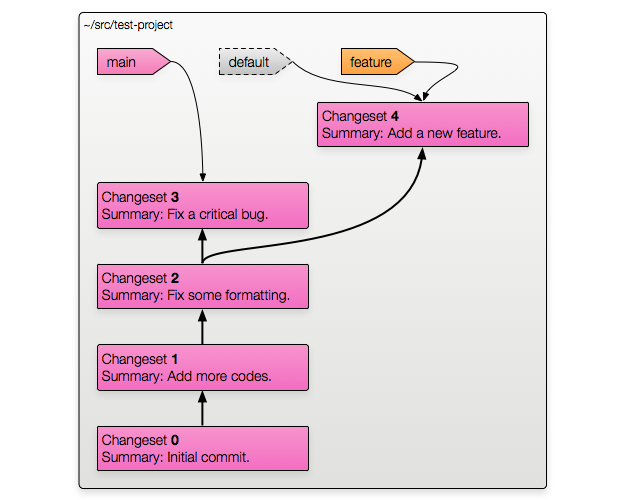
The diagram of the changesets is pretty simple: the branch point was at changeset 2 and each branch has one new changeset on it.
Now let's look at the markers. The default marker is still there, and we're
still going to ignore it.
There are two new labels in this diagram — these represent the bookmarks. Notice how their outlines are not dashed? This is because bookmarks are actual objects stored on disk, not just convenient shortcuts that Mercurial will let you use.
When you use a bookmark name as a revision Mercurial will look up the revision it points at and use that.
Advantages
Bookmarks give you a quick, lightweight way to give meaningful labels to your branches.
You can delete them when you no longer need them. For example, if we finish
development of the new feature and merge the changes in the main branch, we
probably don't need to keep the feature bookmark around any more.
Disadvantages
Being lightweight can also be a disadvantage. If you delete a bookmark, then look at your code a year later and wonder what all those changesets that got merged into main were for, the bookmark name is gone. This probably isn't a big issue if you write good changeset summaries.
Bookmarks are local. They do not get transferred during a push or pull! There has been some whispering about adding this is Mercurial 1.4, but for now if you want to give someone else your bookmarks you'll need to manually give them the file the bookmarks are kept in.
UPDATE: As of Mercurial 1.6 bookmarks can be pushed and pulled between repositories.
Comparison to git
Branching with bookmarks is very close to the way git usually handles branching. Mercurial bookmarks are like git refs: named pointers to changesets that move on commit.
The biggest difference is that git refs are transferred when pushing/pulling and Mercurial bookmarks are not.
Branching with Named Branches
The third way of branching is to use Mercurial's named branches. Some people prefer this method (myself included) and many others don't.
To create a new named branch:
$ cd ~/src/test-project
$ hg branch feature
When you commit the newly created changeset will be on the same branch as its
parent, unless you've used hg branch to mark it as being on a different one.
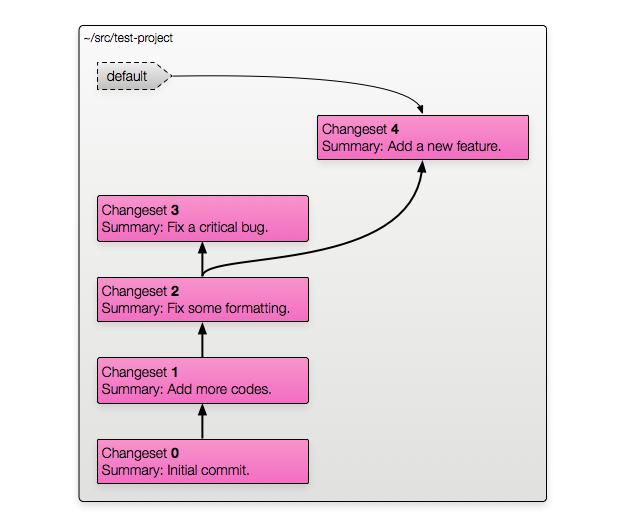
Here's what a repository using named branches might look like:
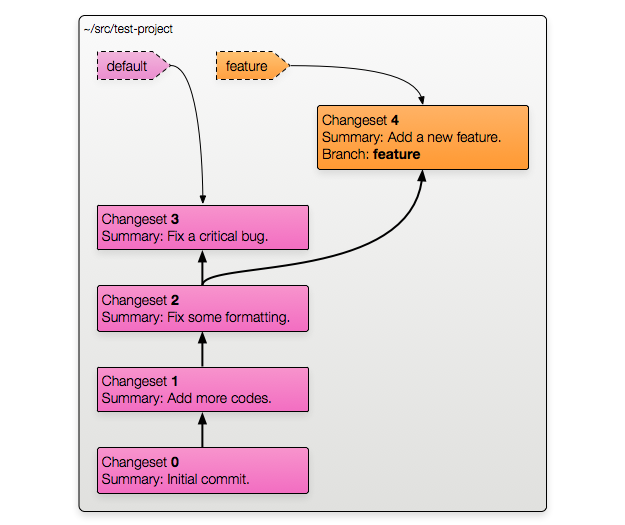
An important difference with this method is that the branch name is permanently recorded as part of the changeset's metadata (as you can see in changeset 4 in the diagram).
Note: The default branch is called default and is not normally shown
unless you ask for verbose output.
Now it's time to explain those magic dashed-border labels we've been ignoring. Using a branch name to specify a revision is shorthand for "the tip changeset of this named branch". In this example repository:
- Running
hg update defaultwould update to changeset 3, which is the tip of thedefaultbranch. - Running
hg update featurewould update to changeset 4, which is the tip of thefeaturebranch.
Neither of these labels actually exist as an object anywhere on disk (like a bookmark would). When you use them Mercurial calculates the appropriate revision on the fly.
Advantages
The biggest advantage to using named branches is that every changeset on a branch has the branch name as part of its metadata, which I find very helpful (especially when using graphlog).
Disadvantages
Many people don't like cluttering up changeset metadata with branch names, especially if they're small branches that are going to be merged pretty quickly.
In the past there was also the problem of not having a way to "close" a
branch, which means that over time the list of branches could get huge. This
was fixed in Mercurial 1.2 which introduced the --close-branch option for
hg commit.
Comparison to git
As far as I know git has no equivalent to Mercurial's named branches. Branch information is never stored as part of a git changeset's metadata.
Branching Anonymously
The last method of branching with Mercurial is the fastest and easiest: update to any revision you want and commit. You don't have to think up a name for it or do anything else — just update and commit.
When you update to a specific revision, Mercurial will mark the parent of the working directory as that changeset. When you commit, the newly created changeset's parent will be the parent of the working directory.
The result of updating and committing without doing anything else would be:
How do you switch back and forth between branches once you do this? Just use
hg update --check REV with the revision number (or hash) (you can shorten
--check to -c).
Note: the --check option was added in Mercurial 1.3, but it was broken.
It's fixed in 1.3.1. If you're using something earlier than 1.3.1, you really
should update.
Logging commands like hg log and hg graphlog will show you all the
changesets in the repository, so there's no danger of "losing" changesets.
Advantages
This is the fastest, easiest way to branch. You don't have to think of a name or close/delete anything when you're finished — just update and commit.
This method is great for quick-fix, two-or-three-changeset branches.
Disadvantages
Using anonymous branching obviously means that there won't be any descriptive name for a branch, so you'll need to write good commit messages if you want to remember what a branch was for a couple of months later.
Not having a single name to represent a branch means that you'll need to look
up the revision numbers or hashes with hg log or hg graphlog each time you
want to switch back and forth. If you're switching a lot this might be more
trouble than it's worth.
Comparison to git
Git has no real way to handle this. Sure, it lets you update and commit, but if you don't create a (named) ref to that new commit you're never going to find it again once you switch to another one. Well, unless you feel like grep'ing through a bunch of log output.
Oh, and hopefully it doesn't get garbage collected.
Sometimes you might not want to think up a name for a quick-fix branch. With git you have to name it if you want to really do anything with it, with Mercurial you don't.
One More Difference Between Mercurial and git
There's one more big difference between Mercurial's branching and git's branching:
Mercurial will push/pull all branches by default, while git will push/pull only the current branch.
This is important if you're a git user working with Mercurial. If you want to
push/pull only a single branch with Mercurial you can use the --rev option
(-r for short) and specify the tip revision of the branch:
$ hg push --rev branchname
$ hg push --rev bookmarkname
$ hg push --rev 4
If you specify a revision, Mercurial will push that changeset and any ancestors of it that the target doesn't already have.
This doesn't apply when you use the "Branching with Clones" method because the branches are separate repositories.
Conclusion
I hope this guide is helpful. If you see anything I've missed, especially on the git side of things (I don't use git any more than I have to) or have any questions please let me know!