The Homely Mutt
Posted on October 1st, 2012.
Now that Sparrow is effectively dead many of its users will be looking for a new email client. If you're not afraid of the terminal you may want to give Mutt a try.
Mutt certainly isn't the prettiest email client around, and its setup/configuration process is one of the ugliest out there. But once you get it set up it's got a lot of advantages over many other email clients.
In this post I'll show you how to set up Mutt on OS X like I do.
- How I Use Email
- Other Guides and Resources
- Overview
- Getting Email
- Mutt!
- Reading Email
- Writing Email
- Sending Email
- Postponing Drafts
- Contacts
- Searching Email
- Conclusion
How I Use Email
This setup is going to be specific to the way I work with email. Notably:
- I have a Google Apps account that provides my steve@stevelosh.com email address.
- I have many other email addresses, but they all simply forward to my main one.
- All mail I send comes from steve@stevelosh.com.
- I store my contacts in the OS X address book.
- All email comes into my inbox (or to a folder for a specific mailing list).
- Once I'm done with an email, I remove it from my inbox and it lives in the "All Mail" archive. I don't sort email into folders after it arrives.
- I sometimes read email offline and mark it for deletion, then sync that deletion back to the server once I get online again.
- Sometimes I write email without an internet connection and send it once I get connected again.
My email setup is tailored around those requirements, so that's what it does best. Mutt is very configurable though, so if you work differently you can probably bend it to make it do what you want.
In particular, extending this setup to work with multiple email accounts wouldn't be too much trouble. I used to work with two separate accounts until I said "screw it, I'll just use the one".
Other Guides and Resources
I've used a lot of other guides to figure out how to get this giant Rube Goldberg machine of an email client working. Here are a few of them:
- http://thomas.pelletier.im/2010/10/low-memory-mail-client/
- http://www.andrews-corner.org/mutt.html
- http://jstorimer.com/shells/2010/01/19/using-mutt-with-gmail-on-osx.html
- http://www.vijaykiran.com/2010/01/27/mutt-for-gmail-imap-on-mac-os-x/
- http://hynek.me/articles/my-mutt-gmail-setup/
- https://wiki.archlinux.org/index.php/Mutt
- http://linsec.ca/Using_mutt_on_OS_X
- http://www.mutt.org/doc/manual/manual.html
- http://pbrisbin.com/posts/two_accounts_in_mutt
- http://upsilon.cc/~zack/blog/posts/2011/01/how_to_use_Notmuch_with_Mutt/
Overview
I'm going to give it to you straight: getting this whole contraption set up is going to take at least an hour from start to finish, not counting the time it'll take to download all of your email and install stuff. Set aside an evening if you're serious about this.
It's an investment, and you might not want to make it. If not, go use Thunderbird, er, Sparrow, er, I don't know, the Gmail web interface or something.
Mutt on its own doesn't do very much, so we're going to combine it with a few other things to get the job done. Here's a bird's eye view of what it'll look like when we're done:
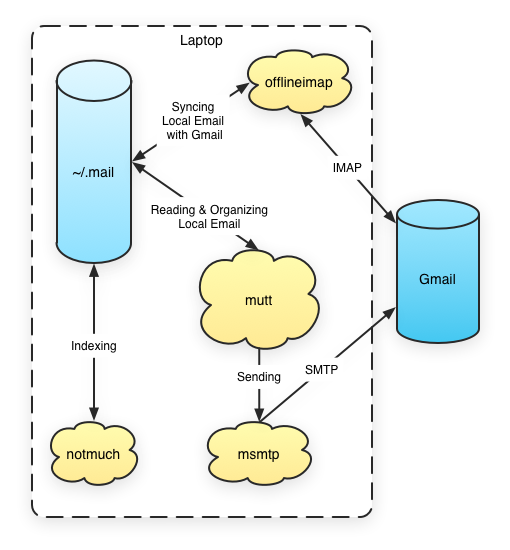
If this diagram doesn't make you run screaming you might just be masochistic enough to make it through the initial setup of Mutt. If you do, you'll be rewarded with email bliss that won't go away when Google or Facebook decide to toss some money around.
Getting Email
First thing's first: we're going to pull down our email from Gmail to our local machine. All of it. It'll take a while the first time you sync, but has a few benefits.
Why Local Email?
Having a local copy of all of your email means you've always got access to it, no matter where you are. Looking for that one person's address they emailed you six years ago when you're trying to find their house and you don't have an internet connection? No problem, it's on your hard drive.
This also acts as a backup in case Google ever decides to kill your Gmail account. It'll be stored in a common format that a lot of programs can read, so you've got a safety net. And the email is stored as normal files, so if you use something like Time Machine or Backblaze that's yet another free backup.
In this setup all of your email is stored as plain text. If you want it encrypted just use OS X's full-disk encryption and you're set.
I use offlineimap to pull email down from Gmail and get it on my hard drive. Offlineimap will also sync any changes you make to this local copy back up to Gmail.
The Alternative
You may not care as much about reading your email offline as I do. If you can tolerate always needing an internet connection to read your mail, you can skip this painful section and follow this guide instead.
You'll probably still find the other sections of this post interesting though.
Installing offlineimap
I've gone through a number of laptops in the past few years, and each time I spend a painful half hour or so screwing around with the latest version of offlineimap's backwards-incompatible changes.
If you're determined to run the latest version of offlineimap, you can install it with pip or something. If you just want to download your fucking email and get on with your life, you can follow the instructions I've laid out for you here:
git clone git://github.com/spaetz/offlineimap.git
cd offlineimap
git checkout 679c491c56c981961e18aa43b31955900491d7a3
python setup.py install
That's the version I'm using. It works. You can use a newer one if you want, but expect to spend some time figuring out how to fix the configuration in this post to work with whatever breaking changes have been made since then. The last time I tried this I got to rewrite all my nametrans stuff. That was fun.
Configuring offlineimap
Once you've got offlineimap installed, you'll need to create
a ~/.offlineimaprc file. You can keep it in your dotfiles repo and symlink it
into place if you want. Here's a sample to get you started:
[general]
ui = TTY.TTYUI
accounts = SteveLosh
pythonfile=~/.mutt/offlineimap.py
fsync = False

[Account SteveLosh]
localrepository = SteveLosh-Local
remoterepository = SteveLosh-Remote
status_backend = sqlite
postsynchook = notmuch new

[Repository SteveLosh-Local]
type = Maildir
localfolders = ~/.mail/steve-stevelosh.com
nametrans = lambda folder: {'drafts':  '[Gmail]/Drafts',
                            'sent':    '[Gmail]/Sent Mail',
                            'flagged': '[Gmail]/Starred',
                            'trash':   '[Gmail]/Trash',
                            'archive': '[Gmail]/All Mail',
                            }.get(folder, folder)

[Repository SteveLosh-Remote]
maxconnections = 1
type = Gmail
remoteuser = steve@stevelosh.com
remotepasseval = get_keychain_pass(account="steve@stevelosh.com", server="imap.gmail.com")
realdelete = no
nametrans = lambda folder: {'[Gmail]/Drafts':    'drafts',
                            '[Gmail]/Sent Mail': 'sent',
                            '[Gmail]/Starred':   'flagged',
                            '[Gmail]/Trash':     'trash',
                            '[Gmail]/All Mail':  'archive',
                            }.get(folder, folder)
folderfilter = lambda folder: folder not in ['[Gmail]/Trash',
                                             'Nagios',
                                             'Django',
                                             'Flask',
                                             '[Gmail]/Important',
                                             '[Gmail]/Spam',
                                             ]
It's kind of long, so let's go through it line by line and see what's going on.
[general]
ui = TTY.TTYUI
accounts = SteveLosh
pythonfile=~/.mutt/offlineimap.py
fsync = False
First we tell offlineimap to use the TTY.TTYUI ui. Yes, this program that
syncs your email has multiple user interfaces. I guess if you can't decide what
color the bikeshed should be you can just build a whole bunch of bikesheds
instead.
Then we specify the accounts. There's only one because as I said before: I only use a single email account that all my addresses forward to. If you wanted to have many, you'd change this line.
The pythonfile is just a file that offlineimap will parse (as Python) before
loading the rest of the config, so you can define custom helper functions more
easily. We'll see more of this later.
We're also telling offlineimap that it doesn't need to fsync after every single operation. This will speed things up, and since it's just a local copy it's typically not a big deal if we lose an email here and there from a crash (it'll just be synced the next time anyway).
[Account SteveLosh]
localrepository = SteveLosh-Local
remoterepository = SteveLosh-Remote
status_backend = sqlite
This next section hooks up a few things. First, it tells offlineimap which local and remote repositories to use for the account. Manual configuration instead of sane defaults is a recurring theme we'll see throughout this process.
Hey, I titled the entry "The Homely Mutt" for a reason.
We're also going to use a SQLite-based cache for this account. If you don't
already have SQLite you'll want to get it with brew install sqlite.
[Repository SteveLosh-Local]
type = Maildir
localfolders = ~/.mail/steve-stevelosh.com
nametrans = lambda folder: {'drafts':  '[Gmail]/Drafts',
                            'sent':    '[Gmail]/Sent Mail',
                            'flagged': '[Gmail]/Starred',
                            'trash':   '[Gmail]/Trash',
                            'archive': '[Gmail]/All Mail',
                            }.get(folder, folder)
Now we're getting to the meat of the configuration. This "local repository" is going to be the mail as it sits on our hard drive. We're going to use the Maildir format because it plays nicely with Mutt (and tons of other stuff).
Then we specify the path where we're going to keep the mail. This is going to take a lot of space if you've got a lot of mail. Attachments are downloaded too. When I said you're getting an offline copy of all your email I meant all of it.
I think offlineimap needs the ~/.mail directory created for it. It's been
a while since I did this, so I might be wrong, but if it complains about not
being able to access the mail folders just go ahead and mkdir ~/.mail.
Next we have the craziest part of the configuration: name translation.
Here's the issue: offlineimap needs to know how to translate the names of folders on the IMAP server to folder names on your hard drive.
Also, Gmail doesn't actually use folders but its own concept called "labels". But since the IMAP protocol doesn't know about labels, it fakes them by making them appear to be folders.
User-created labels in Gmail (like "Mercurial" or "Clients") will appear as folders with those names through IMAP.
Built-in, special Gmail folders have names that start with [Gmail]/. We need
to turn those into something sane for our hard drive, so that's what this
nametrans setting is for. It's a Python function that takes the remote folder
name and returns the name that should be used on your local hard drive.
Yes, you read that right. This is Python code embedded in the right hand side of an INI file's setting assignment. I am not fucking with you, this is seriously how you do it. Go ahead and crack open that beer now.
So the "Sent Mail" folder in your Gmail account will be synced to
~/.mail/steve-stevelosh.com/sent. Cool.
(No, I don't know what would happen if you created a label called [Gmail]/All
Mail in Gmail. If you try please let me know, but I take no responsibility if
it ends with all your email being deleted.)
[Repository SteveLosh-Remote]
maxconnections = 1
type = Gmail
remoteuser = steve@stevelosh.com
remotepasseval = get_keychain_pass(account="steve@stevelosh.com", server="imap.gmail.com")
realdelete = no
nametrans = lambda folder: {'[Gmail]/Drafts':    'drafts',
                            '[Gmail]/Sent Mail': 'sent',
                            '[Gmail]/Starred':   'flagged',
                            '[Gmail]/Trash':     'trash',
                            '[Gmail]/All Mail':  'archive',
                            }.get(folder, folder)
folderfilter = lambda folder: folder not in ['[Gmail]/Trash',
                                             'Nagios',
                                             'Django',
                                             'Flask',
                                             '[Gmail]/Important',
                                             '[Gmail]/Spam',
                                             ]
Finally, the home stretch. The last section described the folder on our local hard drive, and this one describes our Gmail account.
First, we tell offlineimap to only ever use a single connection at a time. You can try increasing this number for better performance, but in my experience Google is not afraid to enforce its rate limits and would cut me off fairly often when I tried that. Just leave it at one if you want to be safe.
Next is the type. Luckily offlineimap provides a Gmail type that handles
a lot of the craziness that is Gmail's IMAP setup. Nice.
Then we have the username. Nothing special here, except that if you have
a non-apps account (i.e.: an actual vanilla Gmail account) you may or may not
need to include the @gmail.com in the username. I don't know. If one doesn't
work, just try the other.
Next we have remotepasseval. This is a bit of Python code (drink!) that
should return the password for the account.
What is this get_keychain_pass function? Well, remember when we saw the
pythonfile setting back in the general section? It's a function defined in
there. I'll talk about that in the next section, for now just accept that it
works.
Next we set realdelete to no. If this is set to yes, then deleting an email
in your inbox would actually delete it entirely. When you set it to no, then
deleting an email from your inbox (or any label's folder) will leave it in
Gmail's All Mail.
If you want to really delete an email, you'll need to delete it from All Mail (which is named archive on our local filesystem, remember?). I feel like this is a good compromise. I rarely care about actually deleting mail, given that I have many unused gigabytes available on Gmail.
Next we have another nametrans setting. This is a Python function (drink!) just like the one for the local repository, except it goes in the other direction. It takes the name of a local folder and returns the name of the folder on the IMAP server. Knowing this, it should be easy to understand this setting.
Finally, we have folderfilter. This is a Python function (drink!) that takes
a remote folder name and returns True if that folder should be synced, or
False if it should not be synced. I've chosen to skip syncing my Spam and
Trash folders, as well as a few mailing list labels I don't check all that
often. Customize this to your own taste.
Retrieving Passwords
We're almost ready, but there's one more thing we need to do, and that's implement a secure way for offlineimap to get access to our Gmail password.
If you don't care too much about security, you can configure offlineimap with a plaintext password right in the config file. But don't do that. It'll only take a minute to do this securely.
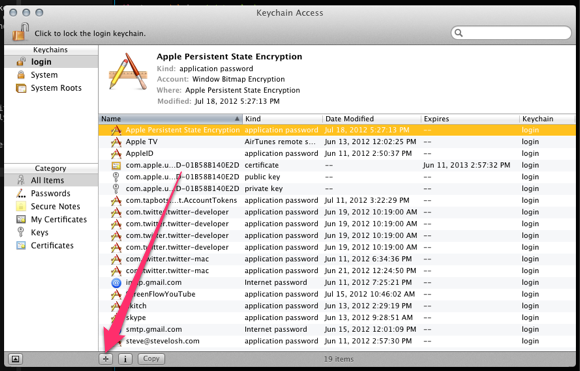
First, you need to add your Gmail password into your OS X keychain. Open the
Keychain Access app and press the + button:
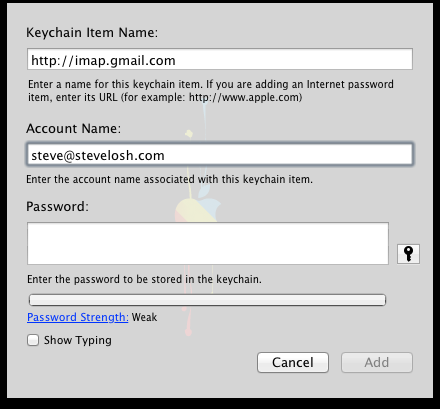
Then fill out the form. The "Keychain Item Name" should be
http://imap.gmail.com. The "Account Name" should be your email address. The
password should be your password:
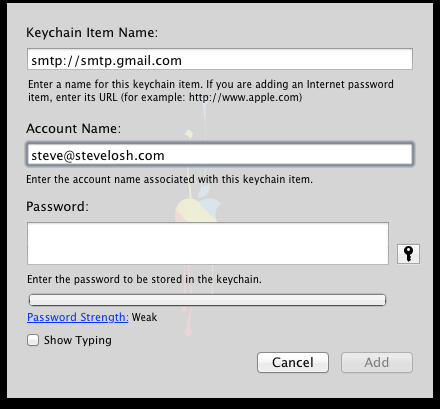
Press "Add". Now repeat the process for the SMTP server. The "Keychain Item
Name" should be smtp://smtp.gmail.com. The "Account Name" should be your
email address. The password should be your password:
Now we need to create the offlineimap.py file we pointed offlineimap to
earlier. It needs to contain the get_keychain_pass function, which takes an
account and server and return the password. Here's the file I'm using:
#!/usr/bin/python
import re, subprocess
def get_keychain_pass(account=None, server=None):
    params = {
        'security': '/usr/bin/security',
        'command': 'find-internet-password',
        'account': account,
        'server': server,
        'keychain': '/Users/sjl/Library/Keychains/login.keychain',
    }
    command = "sudo -u sjl %(security)s -v %(command)s -g -a %(account)s -s %(server)s %(keychain)s" % params
    output = subprocess.check_output(command, shell=True, stderr=subprocess.STDOUT)
    outtext = [l for l in output.splitlines()
               if l.startswith('password: ')][0]

    return re.match(r'password: "(.*)"', outtext).group(1)
In a nutshell, it uses /usr/bin/security to retrieve the password. Read
through the code if you're curious.
This is not completely secure, but it's better than having your password in a plaintext file in your home directory.
Whew! Time to actually run this thing and pull down our email!
Running offlineimap
Assuming everything is in place, open a terminal and run offlineimap:
offlineimap
Go read a book, because this is going to pull down all the email (with attachments) in any folders you didn't exclude in the config file.
If there's an error, stop and figure out what went wrong. Remember,
offlineimap is a two-way sync, so there's always the possibility it'll eat
your email if you seriously mess something up! I wish it had a
--dont-touch-remote option you could use as a safety net for the original
sync, but it doesn't, so be careful!
In the future you can use offlineimap -q to run it in "quick mode". It'll
perform fewer checks but will generally be much faster.
If you want to set up offlineimap to run every 5 minutes or so, you can use
launchd. cron does not work for some reason. I'm not entirely sure why.
Personally I actually like having to press a key to fetch new mail. It's less of a distraction than having new mail rolling in all the time. I can get new email when I'm ready to actually look at it, rather than having it nagging me all the time.
The great part about offlineimap is that once you've got it configured and it's
successfully run once, it's pretty much rock solid from then on. You can run it
often, Ctrl-c it, put the laptop to sleep in the middle of a run, or kill -9
it, and it still won't lose emails. On the next sync it'll fix anything that's
missing.
Mutt!
Now that you've got your email on your computer, it's finally time to start using Mutt itself!
Installing
Mutt can be installed in a bunch of different ways, but the easiest is through Homebrew:
brew install mutt --sidebar-patchThe sidebar patch is a third-party patch that adds a sidebar to Mutt. I don't know why it's not in core Mutt because it's insanely useful. Oh well, at least Homebrew makes it simple to get.
That's pretty much it for installation, but don't get too relaxed because you're far from done.
Configuring
Mutt is very configurable. This is great once you've become a power user and want to mold it to your will, but terrible when you're just getting started.
Mutt settings are kept in a ~/.muttrc file. If this file doesn't exist Mutt
will look for ~/.mutt/muttrc (note the lack of a dot in the filename), so you
can put it there if you prefer.
Let's start by creating a basic ~/.muttrc piece by piece (a lot of this was
taken from this article).
Once you've got a bit of Mutt under your belt you'll want to read the documentation for these settings, but for now just use them to keep things sane.
# Paths ----------------------------------------------
set folder           = ~/.mail               # mailbox location
set alias_file       = ~/.mutt/alias         # where to store aliases
set header_cache     = ~/.mutt/cache/headers # where to store headers
set message_cachedir = ~/.mutt/cache/bodies  # where to store bodies
set certificate_file = ~/.mutt/certificates  # where to store certs
set mailcap_path     = ~/.mutt/mailcap       # entries for filetypes
set tmpdir           = ~/.mutt/temp          # where to keep temp files
set signature        = ~/.mutt/sig           # my signature file
Here we tell Mutt where to find the various folders it needs.
# Basic Options --------------------------------------
set wait_key = no        # shut up, mutt
set mbox_type = Maildir  # mailbox type
set timeout = 3          # idle time before scanning
set mail_check = 0       # minimum time between scans
unset move               # gmail does that
set delete               # don't ask, just do
unset confirmappend      # don't ask, just do!
set quit                 # don't ask, just do!!
unset mark_old           # read/new is good enough for me
set beep_new             # bell on new mails
set pipe_decode          # strip headers and eval mimes when piping
set thorough_search      # strip headers and eval mimes before searching
These are some basic options to make Mutt behave a bit more sanely.
# Sidebar Patch --------------------------------------
set sidebar_delim   = '  │'
set sidebar_visible = yes
set sidebar_width   = 24
color sidebar_new color221 color233
These options are specific to the sidebar patch.
# Status Bar -----------------------------------------
set status_chars  = " *%A"
set status_format = "───[ Folder: %f ]───[%r%m messages%?n? (%n new)?%?d? (%d to delete)?%?t? (%t tagged)? ]───%>─%?p?( %p postponed )?───"
This gives us a pretty status bar with the information we care about (and none of the stuff we don't).
# Header Options -------------------------------------
ignore *                                # ignore all headers
unignore from: to: cc: date: subject:   # show only these
unhdr_order *                           # some distros order things by default
hdr_order from: to: cc: date: subject:  # and in this order
These options hide some of the extra email headers we don't care about when viewing and composing email.
Now it's time to fill on our account details:
# Account Settings -----------------------------------

# Default inbox.
set spoolfile = "+steve-stevelosh.com/INBOX"

# Alternate email addresses.
alternates sjl@pculture.org still\.?life@gmail.com steve@ladyluckblues.com steve@pculture.org

# Mailboxes to show in the sidebar.
mailboxes +steve-stevelosh.com/INBOX \
          +steve-stevelosh.com/vim \
          +steve-stevelosh.com/clojure \
          +steve-stevelosh.com/python \
          +steve-stevelosh.com/mercurial \
          +steve-stevelosh.com/archive \
          +steve-stevelosh.com/sent \
          +steve-stevelosh.com/drafts \

# Other special folders.
set mbox      = "+steve-stevelosh.com/archive"
set postponed = "+steve-stevelosh.com/drafts"
Most of those should be self-explanatory. Fill in the appropriate values for your mail folder(s).
We'll add more as we go through the next few sections, but that's enough to get us started.
Running
Now that you've got Mutt configured you can run it:
muttI like to always be in my ~/Desktop folder when in Mutt, so that when I save
emails or attachments they go there by default. I have a little shell function
set up that cds there for me before running Mutt:
alias mutt 'cd ~/Desktop && mutt'If you run the new fish shell, this is going to cause problems later
(long story, but it's related to the read builtin). Do yourself a favor and
head those confusing issues off at the pass with a fish function:
function mutt
    bash --login -c 'cd ~/Desktop; /usr/local/bin/mutt' $argv;
end
Remember that if you use another shell like this you'll want to set up any
aliases and your PATH for that shell properly (probably identically to your
main shell).
Reading Email
Once you start Mutt you should be looking at a list of the email in your inbox. If so: congratulations! If not: stop and figure out what went wrong.
The Index
When viewing a folder, Mutt presents you with a list of your email. This view is called the "index":
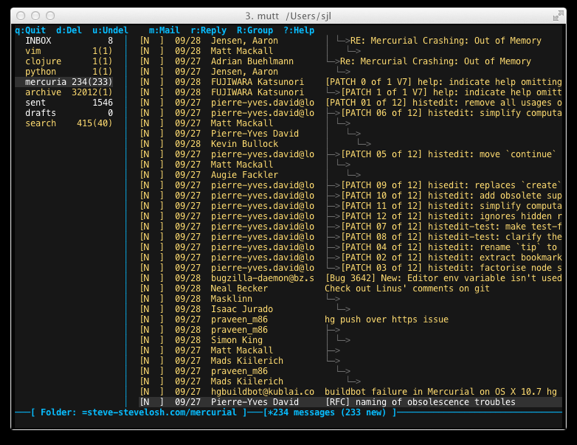
This entry isn't meant be a guide to setting up Mutt on OS X. For a full guide
on how to use Mutt, you can Google around for some tutorials, or just learn as
you go with ?. The ? key will show you a list of all the keys you can use
wherever you currently are, and what they do.
Let's add a few lines to our ~/.muttrc to make the index view behave a bit
more nicely:
# Index View Options ---------------------------------
set date_format = "%m/%d"
set index_format = "[%Z]  %D  %-20.20F  %s"
set sort = threads                         # like gmail
set sort_aux = reverse-last-date-received  # like gmail
set uncollapse_jump                        # don't collapse on an unread message
set sort_re                                # thread based on regex
set reply_regexp = "^(([Rr][Ee]?(\[[0-9]+\])?: *)?(\[[^]]+\] *)?)*"
I won't go into what those do here. You can read the documentation if you're curious.
Quit and rerun Mutt to see your changes. Mutt is a very lightweight program so this should be fast.
Let's also add a few key bindings in the index to make it easier to use:
# Index Key Bindings ---------------------------------
bind index gg       first-entry
bind index G        last-entry

bind index R        group-reply
bind index <tab>    sync-mailbox
bind index <space>  collapse-thread

# Ctrl-R to mark all as read
macro index \Cr "T~U<enter><tag-prefix><clear-flag>N<untag-pattern>.<enter>" "mark all messages as read"

# Sync email
macro index O "<shell-escape>offlineimap<enter>"           "run offlineimap to sync all mail"
macro index o "<shell-escape>offlineimap -qf INBOX<enter>" "run offlineimap to sync inbox"

# Saner copy/move dialogs
macro index C "<copy-message>?<toggle-mailboxes>" "copy a message to a mailbox"
macro index M "<save-message>?<toggle-mailboxes>" "move a message to a mailbox"
Remember to quit and rerun Mutt for them to take effect.
We're going to use j and k to move around, so we may as well support Vim
keys like gg and G too. We'll use R for reply all, since that comes in
handy fairly often. Ctrl-R will mark all messages in the current folder as
read.
Don't worry if you don't understand how all these bindings and macros work right now. You can read the documentation later.
The tab key is going to "commit" changes we've made in Mutt (like deleting an
email) to our local Maildir folder. Once those changes are in the Maildir
folder offlineimap will sync them to the server the next time it runs. This is
nice because it lets us recover if we accidentally do something stupid like
deleting the wrong email.
Note: Mutt will also sync changes for a folder when you switch to a different folder, and when you quit Mutt, so be aware of those.
The space key will toggle collapsing of threads, which can be convenient when
viewing mailing lists (or any conversations with many messages).
The o and O keys will run offlineimap to sync mail. Like I said before,
I prefer having to press a button to grab mail instead of it constantly grabbing
and nagging me. o will sync only the inbox (fast), and O will sync
everything (much slower).
Finally we rebind C and M to perform the same operations they usually do,
but in a more user-friendly manner.
While we're at it, let's add a way to navigate around the sidebar so we can switch folders:
# Sidebar Navigation ---------------------------------
bind index,pager <down>   sidebar-next
bind index,pager <up>     sidebar-prev
bind index,pager <right>  sidebar-open
We're binding the up and down arrow keys to switch between folders, and
right to "enter" a folder. Give it a try.
We don't need the arrows because we can navigate with j and k, but if you
prefer to rebind them to something else feel free.
Practice moving between folders and around in the list, then we'll move on to actually reading emails.
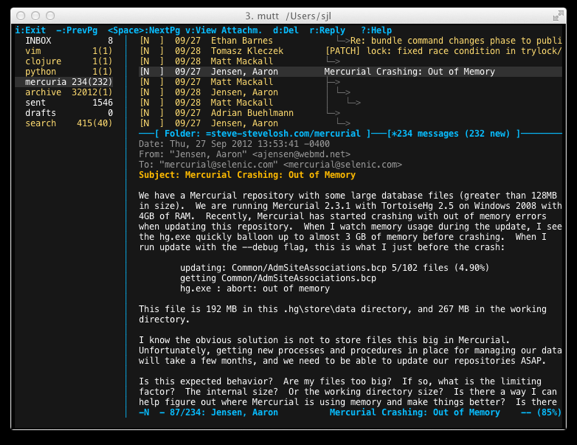
The Pager
Press return in the index to open the selected email. This view is called the
pager:
Like before, let's add a few settings:
# Pager View Options ---------------------------------
set pager_index_lines = 10 # number of index lines to show
set pager_context = 3      # number of context lines to show
set pager_stop             # don't go to next message automatically
set menu_scroll            # scroll in menus
set tilde                  # show tildes like in vim
unset markers              # no ugly plus signs

set quote_regexp = "^( {0,4}[>|:#%]| {0,4}[a-z0-9]+[>|]+)+"
alternative_order text/plain text/enriched text/html
This is a good, sane starting point. And now for a few extra key bindings:
# Pager Key Bindings ---------------------------------
bind pager k  previous-line
bind pager j  next-line
bind pager gg top
bind pager G  bottom

bind pager R  group-reply

# View attachments properly.
bind attach <return> view-mailcap
The first few make scrolling behave like it does in the index. We're also going to use the same key for reply all here. Consistency will make it easier to get Mutt into your fingers.
Don't worry about the last one — that's to make sure Mutt treats attachments properly.
Go ahead and try reading some emails. Remember that ? will always give you
a list of keys and their functions.
Attachments
Now that we're all set for reading plain text email, it's time to deal with attachments.
When you're in the pager view reading an email with attachments, you can press
v to view a list of them:
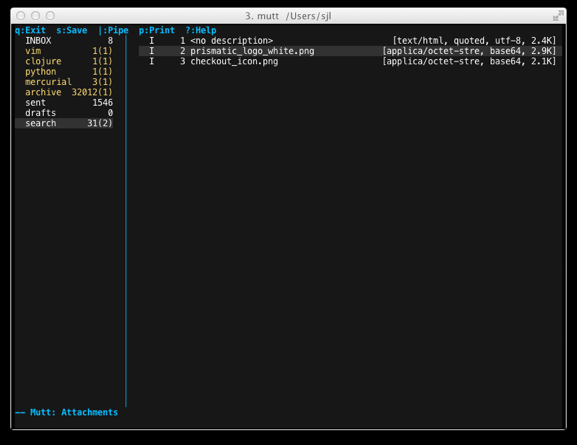
Scroll through the list with j and k and press return to view one. But
first we need to tell Mutt how to view things that aren't text!
For that we need to create a ~/.mutt/mailcap file. Here's a sample to get you
started:
# MS Word documents
application/msword; ~/.mutt/view_attachment.sh %s "-" '/Applications/TextEdit.app'

# Images
image/jpg; ~/.mutt/view_attachment.sh %s jpg
image/jpeg; ~/.mutt/view_attachment.sh %s jpg
image/pjpeg; ~/.mutt/view_attachment.sh %s jpg
image/png; ~/.mutt/view_attachment.sh %s png
image/gif; ~/.mutt/view_attachment.sh %s gif

# PDFs
application/pdf; ~/.mutt/view_attachment.sh %s pdf

# HTML
text/html; ~/.mutt/view_attachment.sh %s html

# Unidentified files
application/octet-stream; ~/.mutt/view_attachment.sh %s "-"
The view_attachment.sh script is from here. Here's a link to
my copy in case that site ever goes down. Grab the script,
chmod it to executable, and stick it in ~/.mutt.
You can poke around and figure out how it works, or you can just not worry about it and get on with life. I recommend the latter (at least for now).
Now you can press return to open an attachment in the proper program.
URLs
One thing you'll probably want to do while reading email is open links. Many terminal programs like iTerm2 let you command-click on a link to open it, but this is Mutt! We shouldn't have to use the mouse!
We're going to use a small helper program called urlview to make it easy to open
URLs in email. First, install it with brew install urlview. Then make
a ~/.urlview file with the following contents:
COMMAND open %sThis tells urlview what command to use to open a URL. We're just going to use
the OS X open command to do the right thing.
Next, add the following line to your ~/.muttrc:
macro pager \Cu "|urlview<enter>" "call urlview to open links"Now when you're reading an email with links in it you can press Ctrl-u to open
urlview. You'll see a screen like this:
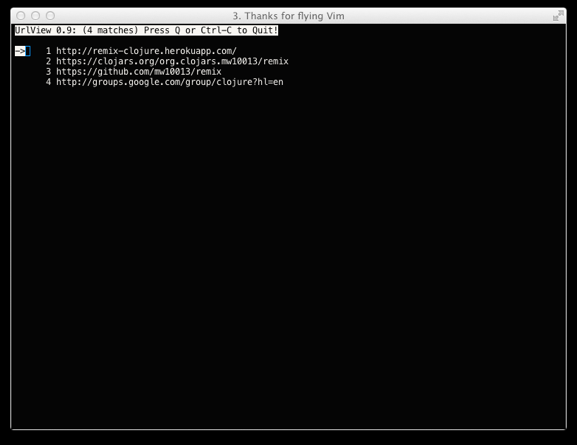
Navigate with j, k, gg, G, or / and press return when the desired
link is selected. That link will be filled in at the bottom of the screen in
case you want to edit it, and you can press return one more time to actually
open it in your default browser.
That about wraps it up for reading email. Now it's time to write some!
Writing Email
Writing email is one of the best parts of Mutt. First let's add a few settings to get things nice and sane:
# Compose View Options -------------------------------
set realname = "Steve Losh"          # who am i?
set envelope_from                    # which from?
set sig_dashes                       # dashes before sig
set edit_headers                     # show headers when composing
set fast_reply                       # skip to compose when replying
set askcc                            # ask for CC:
set fcc_attach                       # save attachments with the body
unset mime_forward                   # forward attachments as part of body
set forward_format = "Fwd: %s"       # format of subject when forwarding
set forward_decode                   # decode when forwarding
set attribution = "On %d, %n wrote:" # format of quoting header
set reply_to                         # reply to Reply to: field
set reverse_name                     # reply as whomever it was to
set include                          # include message in replies
set forward_quote                    # include message in forwards
You can reply to an email with r in the index or pager, or start a fresh one
with m.
There's actually not a lot to say about writing mail, because Mutt itself
doesn't handle it! Mutt passes control off to the text editor of your choice.
Just specify your editor in your ~/.muttrc:
set editor = "vim"        # Use terminal Vim to compose email.
set editor = "mvim -f"    # Use MacVim to compose email.
set editor = "subl -w"    # Use Sublime Text 2 to compose email.
Any command that takes a filename and doesn't return until you're done can be used here.
This is fantastic because it means you can use an editor you're already comfortable and fast in to write email instead of learning yet another set of shortcuts.
Once you save the email in your editor and close it, Mutt will present you with a menu that looks like this:
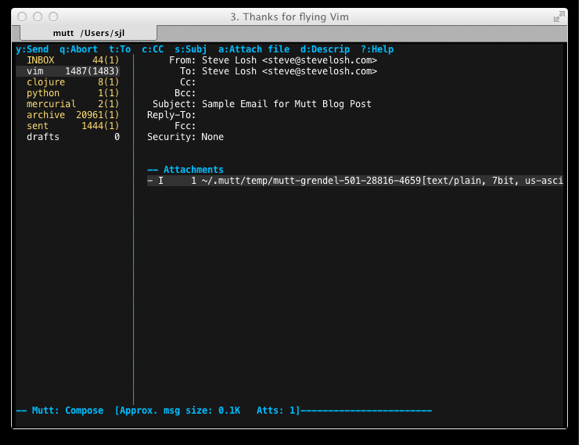
You can press e to go back and edit the mail, a to add attachments, and so
on (the options are listed at the top of the screen).
Before we can continue we need to tell Mutt how to send email. Press q to
discard the email for now.
Sending Email
Mutt does have (some) built-in SMTP support, but we're going to use a separate program to do our sending for a few reasons.
First, Mutt's SMTP support was considered "experimental" the last time I checked. Sending email is kind of important, so we'll stick with something tried and true.
Second, we want a method that won't require our password in a plaintext config file.
Go ahead and install the msmtp program through Homebrew with brew install
msmtp.
Next we're going to need to create a ~/.msmtprc file with the following
contents:
account stevelosh
host smtp.gmail.com
port 587
protocol smtp
auth on
from steve@stevelosh.com
user steve@stevelosh.com
tls on
tls_trust_file ~/.mutt/Equifax_Secure_CA.cert

account default : stevelosh
msmtp will look in your keychain for your SMTP password, which we added
earlier. No plaintext passwords!
The other "interesting" bit here is the tls_trust_file. We're going to be
connecting to Gmail's SMTP server over SSL, and msmtp needs to know if it can
trust the certificate that the server on the other end is sending back.
Copy the following and paste it into the path tls_trust_file is set to:
-----BEGIN CERTIFICATE-----
MIIDIDCCAomgAwIBAgIENd70zzANBgkqhkiG9w0BAQUFADBOMQswCQYDVQQGEwJVUzEQMA4GA1UE
ChMHRXF1aWZheDEtMCsGA1UECxMkRXF1aWZheCBTZWN1cmUgQ2VydGlmaWNhdGUgQXV0aG9yaXR5
MB4XDTk4MDgyMjE2NDE1MVoXDTE4MDgyMjE2NDE1MVowTjELMAkGA1UEBhMCVVMxEDAOBgNVBAoT
B0VxdWlmYXgxLTArBgNVBAsTJEVxdWlmYXggU2VjdXJlIENlcnRpZmljYXRlIEF1dGhvcml0eTCB
nzANBgkqhkiG9w0BAQEFAAOBjQAwgYkCgYEAwV2xWGcIYu6gmi0fCG2RFGiYCh7+2gRvE4RiIcPR
fM6fBeC4AfBONOziipUEZKzxa1NfBbPLZ4C/QgKO/t0BCezhABRP/PvwDN1Dulsr4R+AcJkVV5MW
8Q+XarfCaCMczE1ZMKxRHjuvK9buY0V7xdlfUNLjUA86iOe/FP3gx7kCAwEAAaOCAQkwggEFMHAG
A1UdHwRpMGcwZaBjoGGkXzBdMQswCQYDVQQGEwJVUzEQMA4GA1UEChMHRXF1aWZheDEtMCsGA1UE
CxMkRXF1aWZheCBTZWN1cmUgQ2VydGlmaWNhdGUgQXV0aG9yaXR5MQ0wCwYDVQQDEwRDUkwxMBoG
A1UdEAQTMBGBDzIwMTgwODIyMTY0MTUxWjALBgNVHQ8EBAMCAQYwHwYDVR0jBBgwFoAUSOZo+SvS
spXXR9gjIBBPM5iQn9QwHQYDVR0OBBYEFEjmaPkr0rKV10fYIyAQTzOYkJ/UMAwGA1UdEwQFMAMB
Af8wGgYJKoZIhvZ9B0EABA0wCxsFVjMuMGMDAgbAMA0GCSqGSIb3DQEBBQUAA4GBAFjOKer89961
zgK5F7WF0bnj4JXMJTENAKaSbn+2kmOeUJXRmm/kEd5jhW6Y7qj/WsjTVbJmcVfewCHrPSqnI0kB
BIZCe/zuf6IWUrVnZ9NA2zsmWLIodz2uFHdh1voqZiegDfqnc1zqcPGUIWVEX/r87yloqaKHee95
70+sB3c4
-----END CERTIFICATE-----
If you're paranoid and don't trust that I'm giving you the right cert (or that someone has hacked my site and changed it), you can generate it yourself. I'll leave that to you — if you care enough about it you'll figure it out.
Now we need to tell Mutt to use msmtp. Add the following to your ~/.muttrc
file:
set from     = "steve@stevelosh.com"
set sendmail = "/usr/local/bin/msmtp -a stevelosh"
set sendmail_wait = 0
unset record
The -a stevelosh will need to change to whatever you named your account in the
msmtp config.
The unset record line tells Mutt to not append a copy of every email you send
to a file on your hard drive. Gmail will save the emails you send in the sent
folder, so you'll get the the next time you sync with offlineimap anyway.
The sendmail_wait line tells Mutt to wait for the msmtp program to finish
sending the mail before returning control, instead of running it in the
background. This makes it obvious if there's a problem sending a message, which
I prefer to silent, backgrounded failures.
Now you can send email! Awesome!
Once you've composed a test email and saved it you'll be presented with a screen like this (which we saw in the previous section):
The keys you need are listed along the top. Pressing y now will invoke msmtp
and send your email!
You'll see "Sending message..." at the bottom of the screen while msmtp is working. If there's a problem, Mutt will tell you the error. Figure it out before moving on.
Postponing Drafts
Sometimes I like to read and respond to email without an internet connection, then actually send the replies when I get back to civilization.
Since all of my email is stored locally, reading it offline is trivial.
To reply or compose offline, I use Mutt's "postpone" feature. First I've added
the following line to my ~/.muttrc:
bind compose p postpone-messageNow when I'm at the sending screen instead of pressing y to send I can press
p to postpone the message. This places the message in the drafts folder.
The drafts folder in Mutt is just a normal folder of emails like any other. When you sync with offlineimap your postponed email will get pushed up to Gmail as a draft. You can edit it in the Gmail web interface if you like, and those edits will sync back down too.
If you want to edit your drafts (postponed messages) locally, you need to
"recall" them. I have the following line in my ~/.muttrc to set the key to
the same one as I used to postpone it in the first place:
bind index p recall-messageYou can also use m to start writing a new email, and mutt will prompt you if
there are existing postponed messages.
Once you hit p (or m and then select "yes") Mutt will show you a list of the
postponed messages. Select one and press return to start editing it again.
If there's only one it will skip this step and simply open it for you
immediately.
Once you're done editing you can either postpone it again or send it as usual.
Unfortunately you have to go through the "recall → edit → send" process each time. As far as I know there's no way to simply run down a list of postponed emails sending each one with a single keystroke. But that's not too bad, and it's great to be able to work offline like this.
Once you send the postponed email (through Mutt or the Gmail web interface) it disappears from the drafts folder and the postponed list as you would expect.
Contacts
Next we'll want to get Mutt to autocomplete our contacts from the OS X address book. I like using the OS X address book because it automatically syncs between my laptops and phone, so I only need to maintain one address list.
Autocompleting
Unfortunately I've got some bad news for you: you're going to need to install XCode.
No, not the command-line developer tools. The full XCode. I'm sorry, but trust me when I say it's going to save you a lot of pain, so just grumble to yourself a bit and do it.
Okay, now that you've got XCode you can install the contacts program through
Homebrew with brew install contacts.
contacts is a command-line program that you can use to query your address
book. To tell Mutt how to use it add the following lines to your
~/.mutt/muttrc:
set query_command = "contacts -Sf '%eTOKEN%n' '%s' | sed -e 's/TOKEN/\t/g'"
bind editor <Tab> complete-query
bind editor ^T    complete
Now when you're filling out an email address field you can type a few characters and hit Tab to get a screen like this:
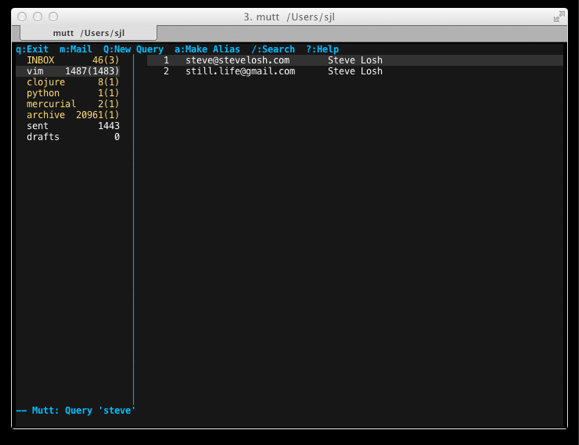
You can use j and k to select an item, press return to complete it. Press
q if you've changed your mind and want to cancel the completion. Look at the
top of the screen for more handy little keys you can use here.
If there's only one item in the list Mutt won't bother showing you this screen and will just complete it right away.
This completion searches more than just the email address. It'll also search the names and possibly other fields from the address book entries as well.
Adding Contacts
What about adding contacts to your address book? Any contacts you add on your phone will automatically be synced, but what if you're reading your mail in Mutt and just want to add the sender as a contact without leaving your command line?
For this I use a little script that Simone Manganelli wrote for me
called addcontact. You can get it here and stick it in your
$PATH somewhere. It's just a command-line utility that you can use like this:
$ addcontact Steve Losh steve@stevelosh.com
$ addcontact "Steve Losh" steve@stevelosh.com
$ addcontact Steve Losh work steve@pculture.org
As you can see, it's pretty flexible.
Note: This utility always adds a new contact record, so if you add someone that's already in there you're going to get a duplicate entry. If that happens you can search for the entries in Contacts.app, select the duplicates, and use "Card → Merge Selected Cards" to combine them.
Okay, so we can now add contacts from the command line. You could set up a Mutt
macro to automatically add senders without too much trouble, but I don't do
that. If I want to add a contact I just hit ! and type out the shell command.
It's not that much work, and sometimes the name in the "From:" field is in
a weird format like "Last, First Middle" instead of "First Last", so this gives
me a chance to clean it up before I add it.
Searching Email
If you have more than a screen full of email in any given folder, you're going to want a way to search through it. Mutt's built-in searching is a good start, but I also use another program to get a bit more power.
Vanilla Searching
There are two main ways to search your email in Mutt: plain searching and "limiting".
Plain searching is done with the / key. It works similarly to Vim or less:
you press /, type your query, and press enter to perform the search. You can
use n to move to the next match, and the search will loop around to the top if
it hits the bottom.
I have the following lines in my ~/.muttrc to bind N to go to the previous
match:
bind index N search-opposite
bind pager N search-opposite
Normally the N key marks a message as unread (or "new"). I personally never
want to do that. Unread mail should be "mail that has not been read". If you
use that feature you'll want to rebind it to something else.
Two things about queries:
- They are regular expressions (actually it's more powerful than than, see the documentation for more information).
- They only search the To and Subject fields (not the message bodies!).
I generally use this kind of searching when I see the email I want to open on
the screen but don't feel like pressing j or k forty times to move through
the list. When I'm actually trying to find a message I can't already see on the
screen I use limiting.
Vanilla Limiting
Limiting is the other way Mutt provides for searching mail. It's done with the
l key by default.
Like /, l will ask you for a pattern. But instead of simply moving you to
the next message that matches the pattern, Mutt will hide messages that don't
match.
This lets you see all the ones that match in a single list. This list works
just like a normal list. You can search it with /, tag things, and so on as
you normally would. It's really quite nice once you get used to it.
To remove the limiting once you're done, you can limit to the special value
all. I've added a line to my ~/.muttrc so I can do that with a single key:
macro index a "<limit>all\n" "show all messages (undo limit)"Note: This shadows the create-alias function which I never use.
Limit queries work exactly like search queries, so you can do powerful stuff
like ~f arthur ~C honza ~s api ("limit to messages from 'arthur', to or cced
to 'honza', containing 'api' in the subject").
Full-Text Searching
By now you're probably wondering how to search the full text of messages. There are two ways: one simple and slow, the other complicated and fast.
First is the simple, slow way. You can use ~B in your searches and limits to
search inside the entire message. If your folder only has a hundred messages
this works great. But once you have a few more (my archive has about 30,000 at
the moment, and I prune it fairly often) it quickly becomes too slow to be
usable.
I use a program called notmuch to index and search my email. It's blazingly fast and works pretty well.
First, install it with brew install notmuch. Now you need
a ~/.notmuch-config file. Run notmuch setup to generate one. It's pretty
straightforward. When it asks you for the path to your archive, that's the path
to the folder containing all your individual IMAP folders
(~/.mail/steve-stevelosh.com in my setup).
Now run notmuch new to perform the initial index. It might take a while if
you have a lot of folders. Subsequent indexes will be much faster since they'll
only reindex whatever changed since the last time.
You'll want to reindex when your email changes, so add a hook in your
~/.offlineimaprc to run notmuch new whenever offlineimap syncs your email:
[Account SteveLosh]
localrepository = SteveLosh-Local
remoterepository = SteveLosh-Remote
status_backend = sqlite
postsynchook = notmuch new
Now you can use notmuch search foo to search your mail for "foo" from the
command line. Try a couple of queries and make sure it works.
Now we need to hook notmuch into Mutt. There are a number of different ways to do this, all of them hacky and ugly. I'll describe how I do it.
A quick overview of how this is going to work:
- You'll press a key in Mutt to activate searching.
- You'll type your query and press return.
- Your mail will be searched with
notmuch. - Τhe resulting messages will be symlinked into a temporary maildir folder.
- That temporary folder will be opened in Mutt.
First get mutt-notmuch-py. The original mutt-notmuch is a Perl script
with many external requirements that are a pain to install, and it doesn't work
on OS X. mutt-notmuch-py is a Python script with zero external requirements.
mutt-notmuch-py is going to handle steps 2 through 4 in the list. Get the
script into your $PATH somehow and then run it:
$ mutt-notmuch-py -G ~/.mail/temporary/search
Query: foo

$ ls ~/.mail/temporary/search
cur new
The -G tells it to not perform certain Gmail-specific stuff that we don't
need. The path is where it will create the temporary maildir folder with the
results. Each time you run it this folder will be wiped clean before the new
results are linked into it.
Now we need to handle the first and last points in the list. I have the
following mapping in my ~/.muttrc:
macro index S "<enter-command>unset wait_key<enter><shell-escape>mutt-notmuch-py ~/.mail/temporary/search<enter><change-folder-readonly>+temporary/search<enter>" "search mail (using notmuch)"That's a lot to take in, so let's see how it works piece by piece:
macro index SWe're going to use the S key to perform a full search of all of our mail.
<enter-command>unset wait_key<enter>Unset the wait_key Mutt option to prevent Mutt from asking us to press a key
after the search has finished.
<shell-escape>mutt-notmuch-py -G ~/.mail/temporary/search<enter>Run mutt-notmuch-py. Control will pass over to that script and it will ask
you for your query, run the search, set up the results folder, and then hand
control back to Mutt.
<change-folder-readonly>+temporary/search<enter>Now we change over to the temporary folder in Mutt, and we're now looking at a list of search results! Since this is a real Maildir folder like any other one we can use the full range of tools to interact with it (searching, limiting, etc).
Finally, let's get this search results folder in our sidebar so we can see where we are visually at all times:
mailboxes +steve-stevelosh.com/INBOX \
          +steve-stevelosh.com/vim \
          +steve-stevelosh.com/clojure \
          ...
          +temporary/search \
Now the search results folder can be navigated like any other one. That's it for email searching! Now you should have a setup that you can use in real life to manage your email.
Conclusion
Mutt is definitely a beast. It's old, crufty, and ugly, but if you spend the time to set it up and learn to use it you'll be rewarded with a fast, powerful, customizable environment for working with your email.
A wonderful trend these days is that more and more sites are including the ability to respond to comments and such by simply replying to their notification emails. This means that often you can reply to Facebook emails, comment on GitHub pull requests, and respond to Bitbucket issues all without leaving the comfort of your finely-tuned email client.
Mutt's not for everyone, but if you deal with a lot of email and have some time to spend you should give it a try. You just might learn to love the old dog.