Mercurial Workflows: Branch As Needed
Posted on February 28th, 2010.
A while ago Vincent Driessen posted an example of a successful git branching model. A lot of git users found that article very helpful, and Dirkjan Ochtman told me I should write a similar article for Mercurial users.
I decided that I didn't want to just write a single entry about one branching workflow. Mercurial is flexible enough to support many different workflows and some of them will fit a given project better than others. Instead I'm going to write a series of posts, each one about a particular workflow.
I'm going to start off with the simplest example I can think of: "Don't worry about branching at all, just deal with it whenever it happens."
Note: In this series I'm going to assume you're comfortable with basic Mercurial commands and you know how Mercurial's various forms of branching work. If you need some review on Mercurial's commands you should look at the hg book. If you need more information on branching concepts you might like my Guide to Branching in Mercurial.
- "Branch as Needed" in a Nutshell
- An Example Scenario
- Branch Setup
- Contributing to the Project
- Merging Changes from Contributors
- Summary
"Branch as Needed" in a Nutshell
The general idea of this workflow is that you don't worry about branching until it actually happens.
The benefit is that it takes no extra work up front and keeps things very simple.
The drawback is that it doesn't scale very well. It's great for small projects but it for larger ones you'll probably want something a bit more structured.
An Example Scenario
This workflow is most suited to small projects. Here's a sample repository with only a single, linear series of changes:
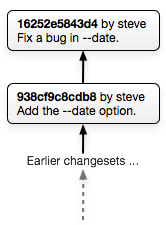
In this example there's mostly just a single developer (you) working on the project to add features, fix bugs, etc.
The repository is online so other people can get the code. They can add features and fix bugs if they want, but it doesn't happen very often because it's a small project.
Note: I find it helpful to have graphs of the changesets in a repository so I can see what's going on. If you want some nice, quick ASCII-art graphs of your own repositories you can use the graphlog extension.
Branch Setup
In this workflow you don't do any up-front setup at all. Just use Mercurial as you normally would, committing your changes along the way and pushing them to somewhere where other people can get them (like BitBucket).
Contributing to the Project
Let's say someone else starts using your project and finds a bug. They go ahead and fix the bug themselves and commit a changeset for the fix. They could then push their copy of the repository to somewhere public (like their own BitBucket account) and it would look something like this:
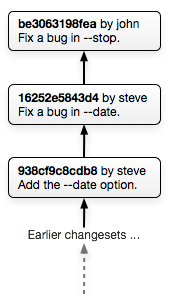
Once their changes are somewhere public they can email you and say:
Hey, I fixed a bug in your project.
The fix is changeset be3063198fea in my copy of your repository at http://.../
Merging Changes from Contributors
When you get an email like this you would head over to their repository and
take a look at the changeset. If you decide it's good and want to incorporate
it into your own repository it's as simple as running hg pull
http://their/repo/.
If you haven't made any new changes your repository would now look exactly like theirs. You can update to the new tip and continue working as usual.
What if you've made changes between the time they cloned (or last pulled) your repository and the time you read the email & pulled their changes? In that case your repository will look like this after you pull from them:
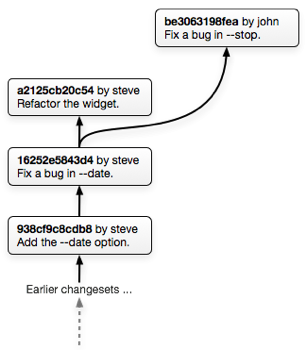
Because John's bugfix changeset and your refactoring changeset both have the same parent there are now two "anonymous branches" in your repository. This doesn't bother Mercurial at all — repositories can have as many "anonymous branches" as you like.
You'll probably want to merge these branches, so you'd run hg update
a2125cb20c54 (if you weren't already there) and then hg merge be3063198fea
to merge John's bugfix with your new changes. The result would look like this:
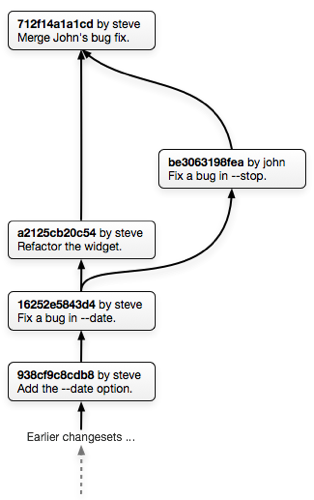
Now you're back to having just one head and you can continue working as usual, with John's changes and your changes all merged together.
Summary
This workflow is the simplest one possible. There's no up-front setup and it's very easy for new people to contribute to the project — they just clone, commit, push, and tell you about their changes. It's great for small projects with one main developer and the occasional contributor.
If you have a project with a lot of people working together this can get pretty chaotic. Your repository graph will end up looking like a tangled mess. In that case you'll want a workflow with a bit more structure.
I'm planning on writing at least two or three more posts about some more complicated branching workflows in the future. If you have any specific examples you think I should write about please let me know!