Going Paper-Free for $220
Posted on May 26th, 2011.
It's 2011. Personal computers have been around and popular for well over a decade now, and yet we still have to deal with a huge amount of physical paper.
I've been wanting to go paper-free for a long time now. The advantages are obvious:
- Paper takes up physical space in our homes that digital files don't.
- Digital files, if properly encrypted, are far more secure than sheets of paper that could be stolen.
- Digital files can be searched in an instant, while papers have to be laboriously sorted through.
- Digital files can be backed up perfectly and easily.
After reading this article I was psyched to scan and shred all the boxes of paper sitting in my apartment, but the $420+ price tag was hard to swallow. I started looking around for other options.
Here are the requirements I have for any paper-free system:
- The scanned files need to be OCR'ed so I can search them easily. I'm too lazy to categorize and tag files manually.
- I need to be able to scan files anywhere. If I'm out at dinner I want to be able to snap a picture of my receipt and tear it up right there.
- No "cloud" services allowed for unencrypted important documents. I simply don't trust Google/Dropbox/etc enough to put my bank statements and such there.
- Files need to be backed up securely in case my apartment burns down.
- The entire process needs to be automated as much as possible, otherwise I'll get lazy and not scan things.
It's taken me a while, but I've finally got a system I'm happy with. This post will describe each part and how they fit together. The total cost is about $220, $160 of which is for a physical scanner.
Note: I use OS X and an iPhone, so this post will focus on that platform. However, the important pieces of software will run on Windows and I'm sure there are Windows/Android equivalents to the other pieces.
- Scanning at Home
- Scanning on the Go
- OCR'ing Scanned Documents
- Gluing Everything Together
- Backing Up
- Destroying the Originals
- Summary
Scanning at Home
The first step to becoming paper-free is obviously scanning your documents. There are a lot of scanners out there, some more expensive than others. I eventually settled on a Doxie for $160.
I chose the Doxie because:
- It's compact.
- It runs with a single USB cable.
- It's cross-platform.
- Its software has a great, polished UI.
- It has a "multiple-function button" that lets you control it without the mouse/keyboard.
The first, second, and last points mean that (with a USB extension cable) I can scan documents while sitting on the couch and watching Netflix, which is critical for lazy people like me.
I set Doxie to save scans on my Desktop. The scanning process is pretty simple so I won't describe it here. Check out Doxie's documentation for more information.
Note: When I first received my Doxie and tried to calibrate it, it simply made a grinding noise and wouldn't feed the paper. I emailed their tech support and within half an hour I got a response back saying they were shipping me a replacement immediately.
When I got the replacement it worked like a charm. Their customer service was so great that I'd still recommend the Doxie even though my first one was a dud.
Scanning on the Go
As I mentioned before, I want to be able to scan things while out and about with my iPhone. There are a bunch of iPhone document-scanning apps out there. I settled on JotNot for $7 because it has a decent UI and supports multiple-page PDFs.
JotNot's UI is pretty easy to get the hang of so I won't go over it here.
Once I finish scanning something I send the PDF to a Dropbox folder called "JotNot".
I know I said in my requirements that "cloud" services weren't allowed, but I make an exception for non-critical things that I'd be scanning with my phone. I don't care if Dropbox knows how much I spent on dinner.
OCR'ing Scanned Documents
The next step is to run the scanned PDFs through an OCR program so they can be searched with Spotlight.
I looked at a lot of OCR software and finally settled on PDF OCR X for $30. It has a simple interface, does a pretty good job at OCR'ing, has a free version so I could try it out, and is cross-platform.
Using it is simple: you drag a PDF onto the app and select your desired settings (make sure to choose "searchable PDF" as the output format). The app will think for a while and then create a new PDF next to the old one with the searchable text embedded.
Once you've done this once you should go into the preferences and change it to non-interactive mode so that it won't prompt you for the settings every time you use it.
Gluing Everything Together
So far we've got two folders with scanned PDFs and a method for OCR'ing them. The next step is to automate the process.
I use an app called Hazel to do this. It's $21 for a license and well worth it. We'll set up four rules to make our lives easier.
Before we start we need to create two folders somewhere (you can name them whatever you like):
- Pending OCR: A folder to hold documents that are waiting to be OCR'ed.
- Dead Trees: A folder to hold the final, OCR'ed versions of our documents.
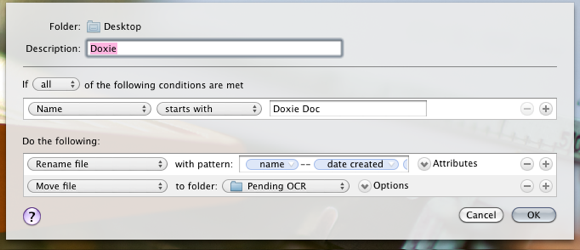
The first rule watches the Desktop for scans from Doxie. Any files placed on the Desktop whose name starts with "Doxie Doc" will be renamed to include the current date and time, and then moved to the "Pending OCR" folder.

Note:: you'll need to click the date created bubble and then "Edit Date" to get
the time as well as the date into the filename.
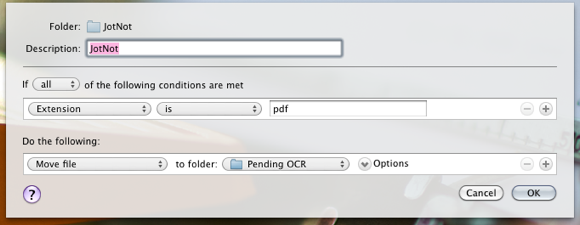
The second rule watches the "JotNot" folder for scans from the iPhone app. Any PDFs that appear in here (i.e. that are synced down from Dropbox) will be moved to the "Pending OCR" folder. We don't need to rename them like we did with the Doxie scans because JotNot already includes the date and time of scans in the filenames by default.

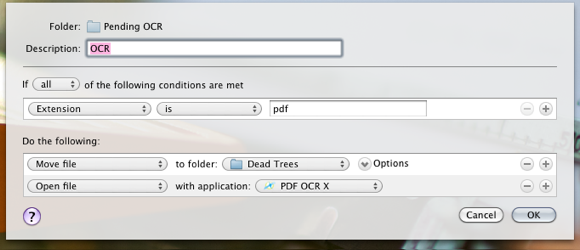
Now that we've got all of our scans going into the same folder (with unique names) we can set up a rule to OCR them. The third rule watches the "Pending OCR" folder for PDFs. When a PDF lands in the folder it will be moved to its final destination folder ("Dead Trees" in my case) and then opened in PDF OCR X. Because I've put PDF OCR X in non-interactive mode the files will automatically be OCR'ed without any intervention from me.

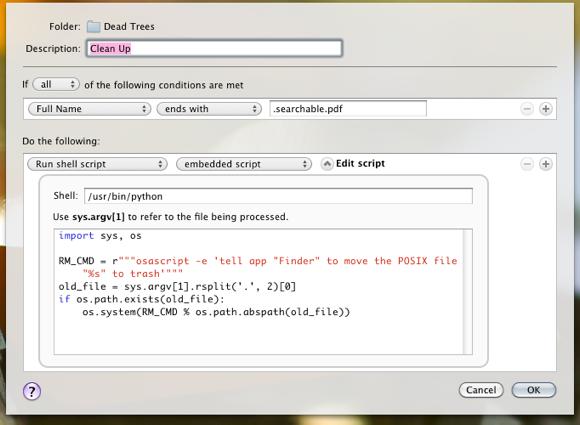
The fourth and final rule watches for the OCR'ed copies of our scans and runs a script to move the originals to the trash once the searchable versions are ready. It doesn't delete the files completely because I want a safety net in case something goes wrong.

Note: make sure you change the Shell to /usr/bin/python. Here's the text of
the script so you can copy and paste it:
import sys, os

RM_CMD = r"""osascript -e 'tell app "Finder" to move the POSIX file "%s" to trash'"""
old_file = sys.argv[1].rsplit('.', 2)[0]
if os.path.exists(old_file):
    os.system(RM_CMD % os.path.abspath(old_file))
Once these four rules are in place we can simply scan a document with Doxie or JotNot and it will automatically be OCR'ed and placed in our "Dead Trees" folder, with no intervention from us!
Backing Up
A while ago I was using Mozy for full backups. Recently they changed their pricing so it was no longer unlimited. When that happened I switched to Backblaze and couldn't be happier.
Backblaze's UI is leaps and bounds above Mozy's, and they offer an option to generate a secure encryption key for encrypting your backups. I highly recommend this, but be sure to have a few copies of your key because you'll need it to restore your backups.
Backblaze is also only $5 per month (less if you pay for a year in advance) for unlimited backups which is definitely a bargain. As a bonus, they just released a "find my computer" feature that's kind of like a lightweight version of Undercover, so it's an even better deal.
Destroying the Originals
Once the documents are scanned and backed up it's time to destroy the physical paper. If you live in a rural area you could burn them for free.
Those of us that can't start random fires need a paper shredder. I use a shredder I picked up a long time ago — any crosscut shredder will do the job.
Summary
After all of this I've now got a mostly-automated system that lets me go paper-free. The costs are:
- Doxie Scanner: $160
- JotNot: $7
- PDF OCR X: $30
- Hazel: $21
- Backblaze: $5 per month
For me the $218 initial cost is worth it. Now I can search all of my paper in a instant and my apartment is much less cluttered. If you have the money to spare I'd definitely consider trying it.