Mercurial Workflows: Stable & Default
Posted on May 17th, 2010.
This entry is the second in my series describing various Mercurial workflows. The first describes the simplest one: branching only when necessary.
If you're working on a larger project you might want something with a bit more structure. This post is about the "stable and default" workflow.
- "Stable and Default" in a Nutshell
- Branch Setup
- Making Changes
- Releasing Major Versions
- Tagging Releases
- Why Default and Stable Instead of Default and Dev?
"Stable and Default" in a Nutshell
The general idea of this workflow is that you keep two branches: default and
stable.
defaultis the branch where new features and functionality are added.stableis where bug fixes are added, as well as documentation improvements that don't pertain to new features.
Each time you make a bug fix in stable you merge it into default, so
default is always a superset of stable.
Periodically (whenever you're ready for a "major release") you'll merge
default into stable so new features can be included in releases.
Mercurial itself uses this workflow for development, so it can scale well to projects of moderate to large size.
Branch Setup
To get started using this workflow you'll need to create a stable named
branch:
hg branch stable
hg commit -m "Create the stable branch."
Once you do this users of your project can clone the stable branch and be
confident that they're getting a relatively stable version of your code. To
clone a branch like this they would do something like:
hg clone http://bitbucket.org/you/yourproject#stableThis will clone your project's repository and include only changesets on the
stable branch (and any of their ancestors).
Making Changes
The goal of this workflow is to do all non-bugfix development on the default
branch. Pure bug fixes should go on the stable branch so stable stays as,
well, "stable" as possible.
Users that want to live on the bleeding edge of development can use the
default branch of your project. Hopefully your project has some users that
are willing to work with default and inform you of bugs found with the new
functionality you add to it.
Whenever you make a change to stable you'll want to merge it into default
so that default always remains a superset of stable. This makes default
as stable as it can possibly be. It also makes it easier to merge default
back into stable whenever you're ready for a major release.
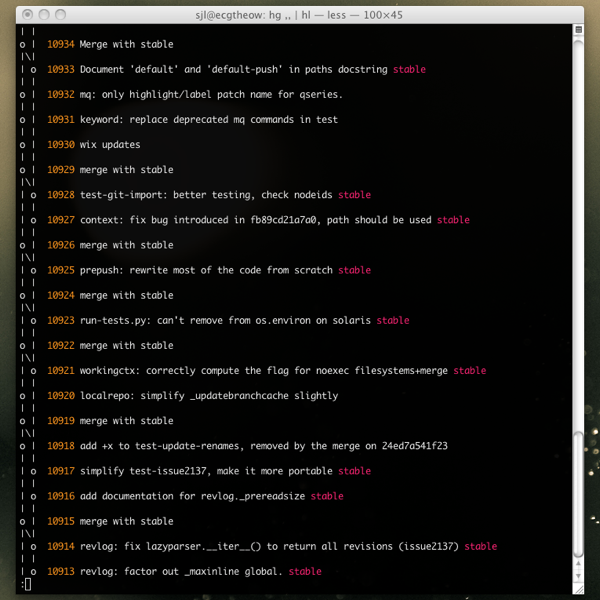
Here's an example of how your repository's graph will end up looking:

Notice how each time some changes are made on stable they're merged to
default.
Releasing Major Versions
There will come a time when you're ready to release non-bugfix improvements to
your project to the general public. Non-bugfix improvements are made in the
default branch, so when you're ready to do this you'll merge default into
stable.
Because your project has more stable users than bleeding-edge users, you'll
probably get more bug reports than usual after you release a major version.
This is to be expected and you should be ready for it.
Tagging Releases
Any decent project should tag releases. This lets users easily use a version of your project that they know works.
Wondering how to decide when to tag releases, and what to use for the tags? The semantic versioning specification is a great guide that makes it easy for your users to know (in a broad sense) what each release changes.
In a nutshell, tags in a semantically versioned project work like this:
- Tags are of the form "v[MAJOR].[MINOR].[BUGFIX]"
- Tags with a major version of "0" make no guarantees about anything. They are used for alpha/beta versions of the project.
- An increase in the bugfix version of a project means "bugs were fixed."
- An increase in the minor version of a project means "functionality has been added without breaking backwards compatibility."
- An increase in the major version of a project means "backwards compatibility has been broken."
Unfortunately this workflow makes it a bit more complicated to add semantic versioning tags to your project. The rules for semantic tagging would work like this:
- When you fix a bug on the
stablebranch, increment the bugfix version onstableand mergestableintodefault. - When you add new functionality and are ready to release it to the public,
merge
defaultinto stable and increment the minor version ofstable. - When you're ready for a backwards-incompatible release, merge
defaultinto stable and increment the major version ofstable.
The problem with this is that default never has any version tags. However,
this probably isn't a big deal because users of default are those that want
to live on the bleeding edge of your project and aren't as concerned with
stability.
Why Default and Stable Instead of Default and Dev?
In the workflow I've described there are two branches: default and stable.
You might be wondering why default is used for new development and the
"stable" branch is relegated to a named branch.
The reason is that default will typically have many, many more changesets
added to it than stable, and so making the "development" branch the default
makes it easier on the developers.
There is absolutely nothing wrong with making default the "stable" branch
and creating a dev branch for "unstable" changes. If your project rarely adds
new functionality but is more concerned with fixing bugs this version of the
workflow will obviously be better for you.
This version also has the added advantage of giving users that naively clone your project (without a branch specified) the stable version. Since many users don't bother to read instructions even when you provide them, there is a strong argument for using it even when your project is not overly concerned with bug fixes.
It's up to you to decide which version you want to use.