The Caves of Clojure: Part 3.1
Posted on July 9th, 2012.
This post is part of an ongoing series. If you haven't already done so, you should probably start at the beginning.
This entry corresponds to post three in Trystan's tutorial.
If you want to follow along, the code for the series is on Bitbucket and
on GitHub. Update to the entry-03-1 tag to see the code as it stands
after this post.
Summary
In Trystan's third post he introduces three new things:
- Random world generation.
- Smoothing the world to look nicer.
- The "play screen" and scrolling.
I'm going to split this up into three separate short posts, so you can see the process I actually went through as I built it. This post will deal with the world generation and basic displaying. The next one will be about smoothing, and the one after that about scrolling around.
Organization
First of all, my single core.clj is going to get a bit crowded by the time
we're done with this, so it's time to start splitting it apart. I made
a world.clj file alongside core.clj. That'll do for now.
Creating a Random World
First I set up the namespace:
(ns caves.world)Next I defined a constant for the size of the world. I chose 160 by 50 tiles arbitrarily:
(def world-size [160 50])I moved the World record declaration out of core.clj and into this file:
(defrecord World [tiles])I also added the tiles attribute to it. For now I'm going to store the tiles
as a vector of rows, where each row is a vector of tiles.
What is a tile? For now it's going to be a simple record:
(defrecord Tile [kind glyph color])Tiles are immutable, so let's make a map of some of the ones we'll be needing:
(def tiles
  {:floor (new Tile :floor "." :white)
   :wall  (new Tile :wall  "#" :white)
   :bound (new Tile :bound "X" :black)})
The :bound Tile represents "out of bounds". It will be returned if you try to
get a tile outside the bounds of the map. There are other ways to handle that,
but this is the one Trystan used so I'm going to use it too.
Next I created a little helper function for retrieving a specific tile:
(defn get-tile [tiles x y]
  (get-in tiles [y x] (:bound tiles)))
Remember that we're storing the tiles as a vector of rows, so when we index into it we need to get the y coordinate (i.e.: the row) first, then index in for the column with the x coordinate.
This is a bit ugly, but storing the screen as rows is going to help us later as we draw the screen, and it gives us the opportunity to do bounds checking as well.
The get-in call is a really handy way to check bounds. No worrying about
comparing indexes to dimensions — just try to get it and if you fail it must be
out of bounds.
That's about it for the world structure. Time to move to the generation:
(defn random-tiles []
  (let [[cols rows] world-size]
    (letfn [(random-tile []
              (tiles (rand-nth [:floor :wall])))
            (random-row []
              (vec (repeatedly cols random-tile)))]
      (vec (repeatedly rows random-row)))))

(defn random-world []
  (new World (random-tiles)))
Nothing too fancy happening here. In random-tiles I built up a series of
helper functions to make it easier to read. You could save some LOC by just
using anonymous functions instead, but to me this way is easier to read.
Personal preference, I guess.
For now we're just going to generate a world where every tile has an equal chance of being a wall or a floor. I might revisit this later if I want to make the caves sparser or denser.
That's it for the world generation. Next we'll move on to actually displaying the new random worlds.
Displaying
Let's switch back to core.clj. First I updated the namespace to pull in the
random-world function:
(ns caves.core
  (:use [caves.world :only [random-world]])
  (:require [lanterna.screen :as s]))
Before going further I decided to do a bit of cleanup. Instead of hardcoding the 80 by 24 terminal size, I pulled it out into a constant:
(def screen-size [80 24])I updated clear-screen to use that:
(defn clear-screen [screen]
  (let [[cols rows] screen-size
        blank (apply str (repeat cols \space))]
    (doseq [row (range rows)]
      (s/put-string screen 0 row blank))))
It's still not perfect (what if the user's terminal isn't 80 by 24?) but it's not something I care enough to fix right now. I'll get to it later. At least now the hardcoded numbers are in one spot.
There's a few things I need to do to get the world on the screen. First
I created a :play UI similar to Trystan's. I'm not a big fan of the
generic-sounding name, but I couldn't come up with anything better in a few
minutes of thinking.
Creating a UI requires implementing the draw-ui and process-input
multimethods from the previous post. I'll start with the easy one: input
processing.
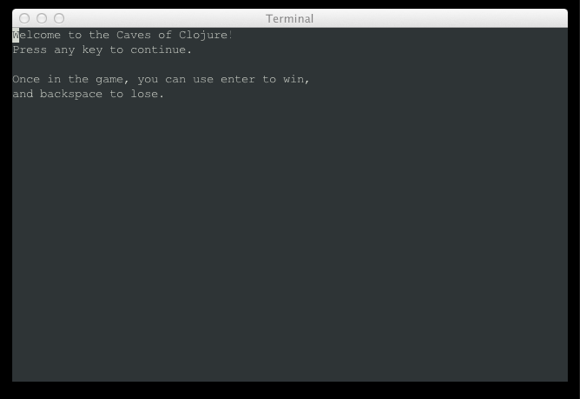
For now the flow of the game will go like this:
- The player is shown an introduction screen with some instructions.
- They press a key and see the world.
- Pressing enter wins the game. Backspace loses the game. Any other key does nothing.
- Once they win or lose, they see a text blurb and can press escape to quit, or any other key to GOTO 1.
With that in mind, I wrote the process-input implementation for :play UIs:
(defmethod process-input :play [game input]
  (case input
    :enter     (assoc game :uis [(new UI :win)])
    :backspace (assoc game :uis [(new UI :lose)])
    game))
I'm still replacing the entire UI stack at once. I'm going to be throwing that code away later anyway so it's not a big deal.
Now I need to update the :start UI to send the user to the :play UI instead
of directly to the :win or :lose UIs.
(defmethod process-input :start [game input]
  (-> game
    (assoc :world (random-world))
    (assoc :uis [(new UI :play)])))
I also decided that this is where I'd generate the new random world. It makes sense to put that here, because every time you restart the game you should get a different world.
On the other hand, this means that the process-input function is no longer
pure for :start UIs (all the other input processing functions are still pure).
I'm not sure how I feel about that. For now I'm going to accept it, but I may
rethink it in the future.
Now that I have the world generation in there, I can remove the (new World)
call from the new-game helper function:
(defn new-game []
  (new Game nil [(new UI :start)] nil))
Now new-game does even less than before. It just sets up a game object with
the initial UI and nil world/input.
Okay, on to the last piece: drawing the world. This is some pretty dense code, but don't be scared — I'll guide you through it and we'll make it together:
(defmethod draw-ui :play [ui {{:keys [tiles]} :world :as game} screen]
  (let [[cols rows] screen-size
        vcols cols
        vrows (dec rows)
        start-x 0
        start-y 0
        end-x (+ start-x vcols)
        end-y (+ start-y vrows)]
    (doseq [[vrow-idx mrow-idx] (map vector
                                     (range 0 vrows)
                                     (range start-y end-y))
            :let [row-tiles (subvec (tiles mrow-idx) start-x end-x)]]
      (doseq [vcol-idx (range vcols)
              :let [{:keys [glyph color]} (row-tiles vcol-idx)]]
        (s/put-string screen vcol-idx vrow-idx glyph {:fg color})))))
Let's look at this beast line-by-line. First we pull the tile vector out of the game object with Clojure's destructuring:
{{:keys [tiles]} :world :as game}This seems a bit hard to read to me, so I might move it into the let statement
with a get-in call later. Maybe.
Next I bind a bunch of symbols I'll be using:
(let [[cols rows] screen-size
      vcols cols
      vrows (dec rows)
      start-x 0
      start-y 0
      end-x (+ start-x vcols)
      end-y (+ start-y vrows)]
  ,,,)
cols and rows are the dimensions of the screen (hardcoded at 80 by 24 for
the moment).
vcols and vrows are the "viewport columns" and "viewport rows". The
"viewport" is what I'm calling the part of the screen that's actually showing
the world. I'm reserving one row at the bottom of the screen to use for
displaying the player's hit points, score, and so on. It would be trivial to
increase that to two rows if I need more later.
start-x and start-y are the coordinates of the upper-left corner of the
viewport in the full map, and end-x and end-y are the coordinates of the
lower-right corner. For now I'm just displaying the upper-left section of the
map. In the entry after the next one I'll add the ability to scroll around.
It's easier to explain with a diagram. Imagine I reduced the size of the world to 10 by 10 and the terminal to 5 by 3, and the user was standing near the middle of the map:
      columns (x)
      0123456789
rows 0..........
(y)  1..........
     2..........
     3..VVVVV...
     4..VVVVV...
     5..VVVVV...
     6..........
     7..........
     8..........
     9..........
Here V represents the portion of the map the viewport can show (which is what
we'll be drawing to the user's terminal). In this example start-x would
be 2, start-y would be 3, end-x would be 6, and end-y would be 5.
Okay, so I've calculated the part of the map that needs to be drawn. Now I loop through the rows:
(doseq [[vrow-idx mrow-idx] (map vector
                                 (range 0 vrows)
                                 (range start-y end-y))
        :let [row-tiles (subvec (tiles mrow-idx) start-x end-x)]]
  ,,,)
This is a bit obtuse, but basically the map call pairs up the viewport row and
map row indices. In our example it would result in this:
[[0 3]
 [1 4]
 [2 5]]
So viewport row 1 corresponds to map row 4. There's probably a less
"clever" way to do this that I should use instead.
For each row, I grab the tiles we're going to draw and store them in a vector
called row-tiles by grabbing the row of tiles from the world and taking
a slice of it.
Almost there! Next I loop through each column in the row:
(doseq [vcol-idx (range vcols)
        :let [{:keys [glyph color]} (row-tiles vcol-idx)]]
  ,,,)
For each column I grab the appropriate tile and figure out what glyph and color
to draw (remember the definition of Tile: (defrecord Tile [kind glyph
color])).
Finally I can actually draw the tile to the screen at the appropriate place:
(s/put-string screen vcol-idx vrow-idx glyph {:fg color})Whew! If that seemed painful and fiddly to you, trust me, I agree. I'm open to suggestions on making it easier to read.
Results
Now that the :play UI knows how to draw itself and process its input, and is
properly hooked up by the :start UI, it's time to give it a shot!
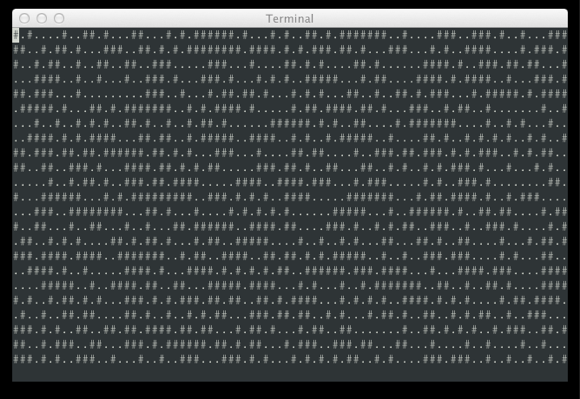
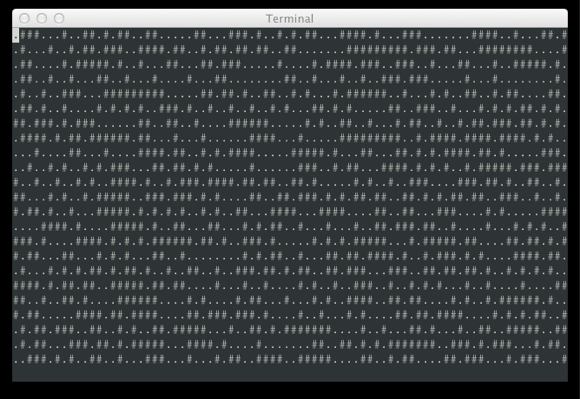
Each time we start we get a different random world. Great!
The code is getting a bit big to include in its entirety, but you can view it on GitHub.
That covers the first part of Trystan's third post. Aside from the painful
draw-ui function it was pretty easy to add. In the next post I'll add the
smoothing code to make the caves look a bit nicer.