Learning Nalbinding
Posted on September 1st, 2026.
Off and on over the past year or so I've been learning nalbinding (also called "needlebinding" and a lot of other things), a fiber art which predates knitting by thousands of years. It's been a very rewarding, relaxing, and cozy hobby (especially in the winter months), but it's not nearly as popular as knitting or crochet so it can be difficult to find good resources to learn from. Here are a couple of videos that show what it looks like, to give you an idea:
In this post I'm going to describe how I learned, some of the things I've made, and generally just write down all the things I wish I could have told myself a year ago when I was starting out. There are a lot of other great resources out there, so you should search around for those too if you're interested. This is all just what happened to work well for me.
Why Learn Nalbinding?
I first heard of nalbinding when my partner and I visited the Eiríksstaðir museum in Iceland. I never had any exposure to knitting or crochet at all when I was growing up as a boy in rural Pennsylvania in the 80's and 90's, so I had certainly never heard of nalbinding either.
A few months later I found myself wanting to make her a gift that would keep her warm, and remembered our visit. She's experienced at knitting and crochet, so I didn't want to just make her a worse version of something she could have made herself. But she had never learned nalbinding, so I decided to give it at try and see if I could make something.
In hindsight, I think I may have been primed to become interested in nalbinding by reading Bob Nystrom's Consider Knitting article a few months before our trip. A lot of what he wrote resonated with me, especially around the tactile experience of making something. I've done some bookbinding in the past and really enjoy the process of making something physical with slow, steady forward progress, watching a tidy collection of materials on my workbench take shape into something over the course of a few weeks or months. But knitting itself seemed very overwhelming to dive into from scratch, with so many different sizes and shapes of needles, so many different patterns, yarns, styles of knitting, and such. So while I very much appreciated what he was describing, it all seemed very unapproachable to me, especially as someone who looks and feels very out of place in a yarn store and didn't feel comfortable joining an in-person class. So when I heard about nalbinding and started looking into it, it seemed like a great way to scratch the same itch that he was describing, but didn't seem quite as overwhelming.
Much like I imagine knitting would be, nalbinding has been a very cozy activity for me, especially during the winter months in a cold climate. Once you get a little experience it's very relaxing to be able to make something while you're spending time with people, watching a movie, listening to an audiobook or podcast, or traveling as a passenger. There are also a few other reasons you might decide to pick up nalbinding over knitting/crochet even if you don't have a partner that already knows how to do those.
Nalbound items are generally very warm, because they're usually made with relatively thick wool. I've always lived in cold places (the northeastern US and Reykjavík) so I can appreciate this.
Nalbinding is also very durable. Unlike knitting, it won't unravel if a piece of the yarn breaks. You can even cut a piece of nalbinding work in half with scissors and the halves still won't unravel, which some people exploit to make a large sheet of fabric easily by making a cylinder and cutting it along the long edge. I wanted to make things I could wear without having to worry too much about damaging them, so the extra durability was really great for my peace of mind.
Unlike knitting, nalbinding (usually) uses your thumb as a gauge to determine the width of the stitches. Everyone's thumb is a different size, which means my stitches will be a different size than yours. Because of this, nalbinders don't usually work from a fixed pattern like you often see in knitting, but you just sort of learn the basics, come up with a general plan for the thing you want to make and then… wing it, figuring out the specifics as you go. This might sound intimidating, but I've personally found it very freeing to not have to follow a fixed pattern. I imagine that if I tried to follow I pattern I'd be constantly worried about messing it up and having to undo a ton of work to make it "correct", and that once I finished I'd inevitably compare my result to the pattern-maker's original and be unsatisfied.
The barrier to entry for nalbinding is, equipment-wise, almost comically low. You can try it out with a popsicle stick, a ball of yarn, your thumbs, and nothing else. There are a few other things that are nice to have that you might want to get if you decide you like it and want to continue, but you really don't need much to get started. Maybe this is why it appeared so early in humanity's history.
Speaking of history, nalbinding has been around for thousands of years (e.g. the Wikipedia page above mentions that an early fragment was found from 6500 BCE) and has been done by humans all over the world. I personally found it really very satisfying to learn an art that our species has been doing for millennia. Unlike the rest of this blog (which is mostly about computer programming), nalbinding gives me a sense of being connected to a much longer chain of humanity. If I were somehow transported back in time eight thousand years, I could pick up a needle and nalbind alongside someone without too much fuss, which I personally find pretty cool.
Since then I've made a bunch more things for my partner and myself, and I'm looking forward to making a lot more this winter. I think it's a really fun and interesting art that anyone can learn, even if you weren't already taught how to knit or crochet as a kid, you don't have access to someone to teach you in-person, and you don't feel comfortable joining an in-person class.
Getting Started
You really don't need a lot of things to get started with nalbinding, just:
- A needle
- Yarn
- Videos to learn from
- An idea to make
There's a pretty good chance that all of these are available near you right now if you know what to look for, so if you read this and it sounds exciting you can probably gather what you need and be trying your first nalbinding in just a few hours!
Getting or Making a Needle
A typical nalbinding needle is a long (3-4 inches / 8-10 cm), wide (0.25-0.5 inches / 0.5-1 cm), blunt needle, usually made of wood, bone, horn, or plastic, with a large hole at the end for yarn to go through. Here's a picture of (most of) the needles I've collected over the past year:
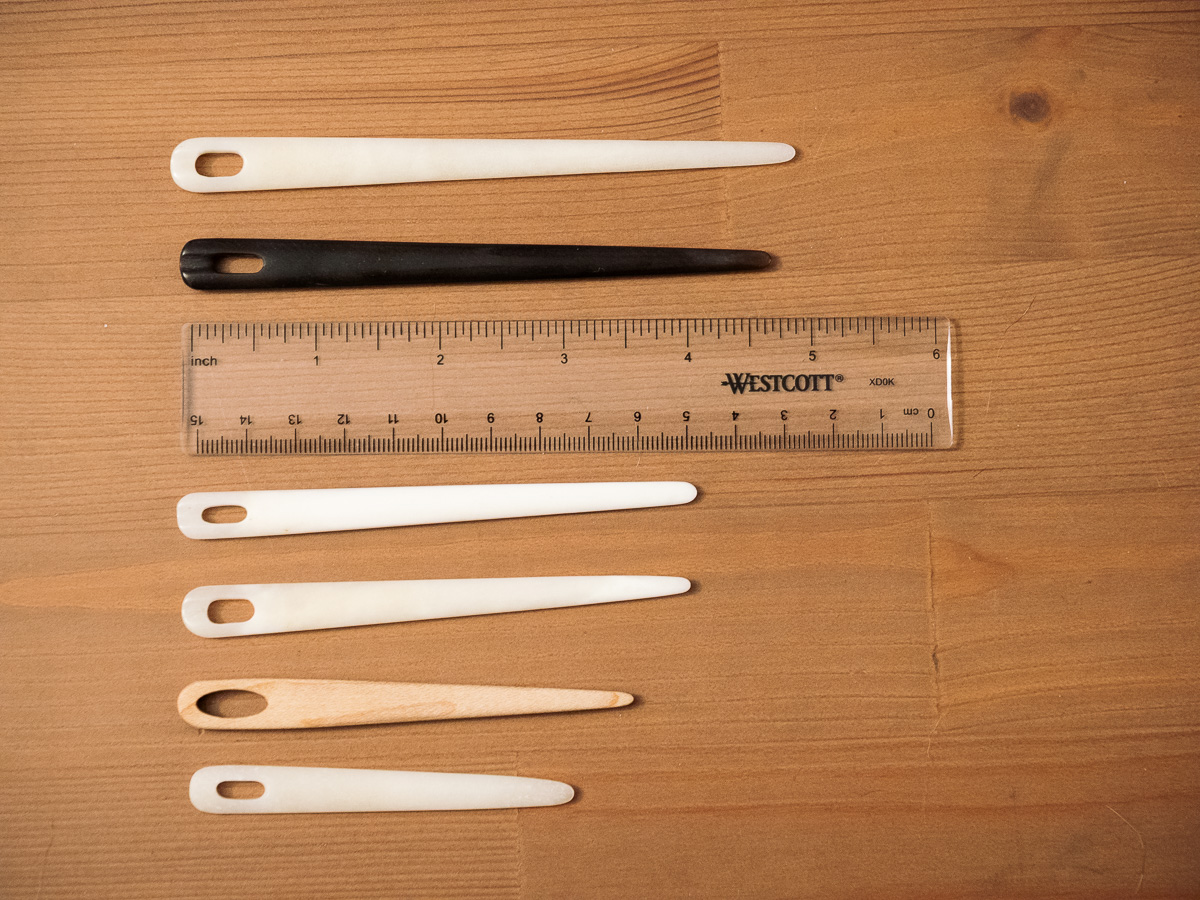
Collecting needles is fun, but you really only need one. 90% of everything I've made has been with one of the two needles on top, which are my favorite ones. I'll talk about where to get this kind of needle later (and how to customize it to make it even better) but you can actually get started with something even simpler: buying a tapestry needle or making your own.
Starting with a Tapestry Needle
I personally got started with this metal needle which was under $1 at a local shop:
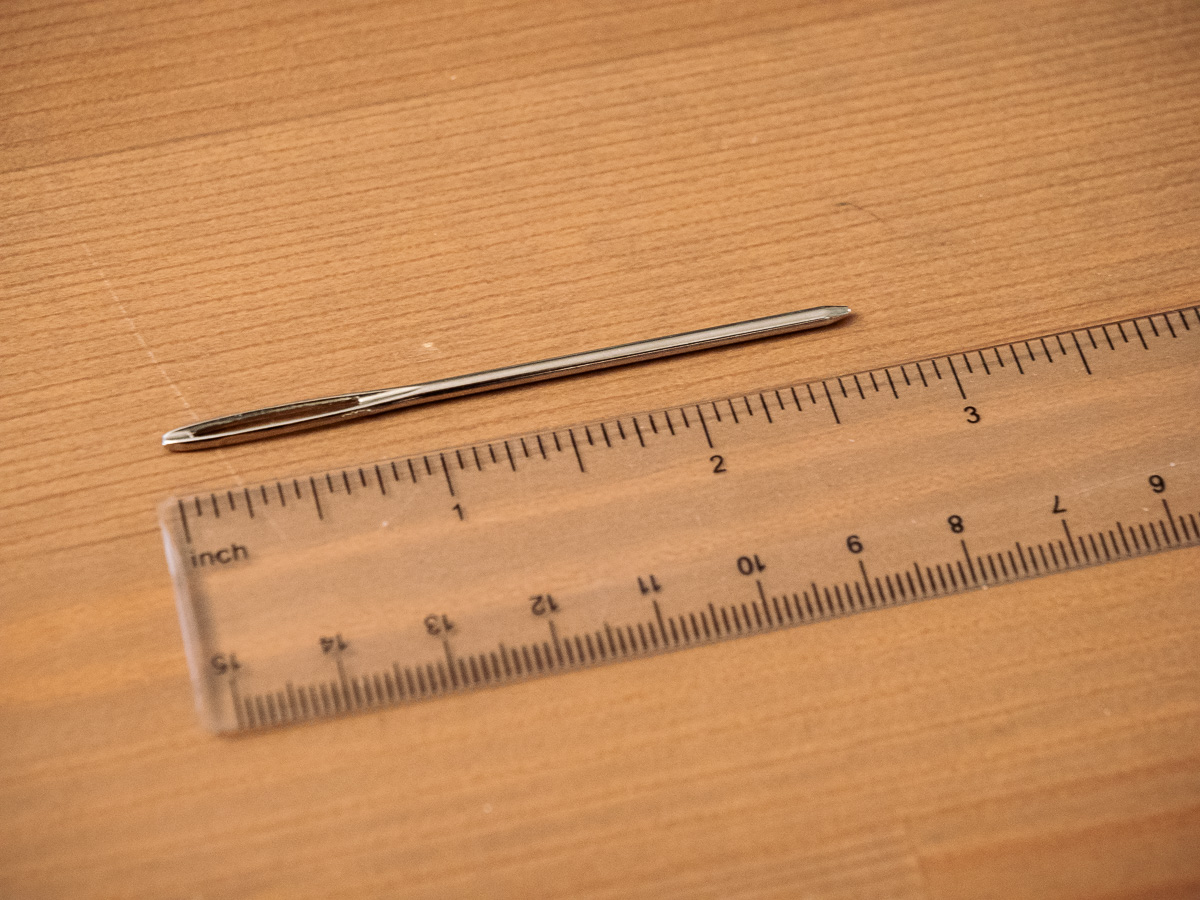
You'll be able to find something like it at any craft store, it'll probably be called something like a "tapestry needle" or a "darning needle" or a "yarn needle". You want something relatively long, blunt, straight, and with as large a hole as possible. You might also be able to find some that are plastic — I found this package of two in the (very tiny) crafts section of a Meijer grocery store for $2:
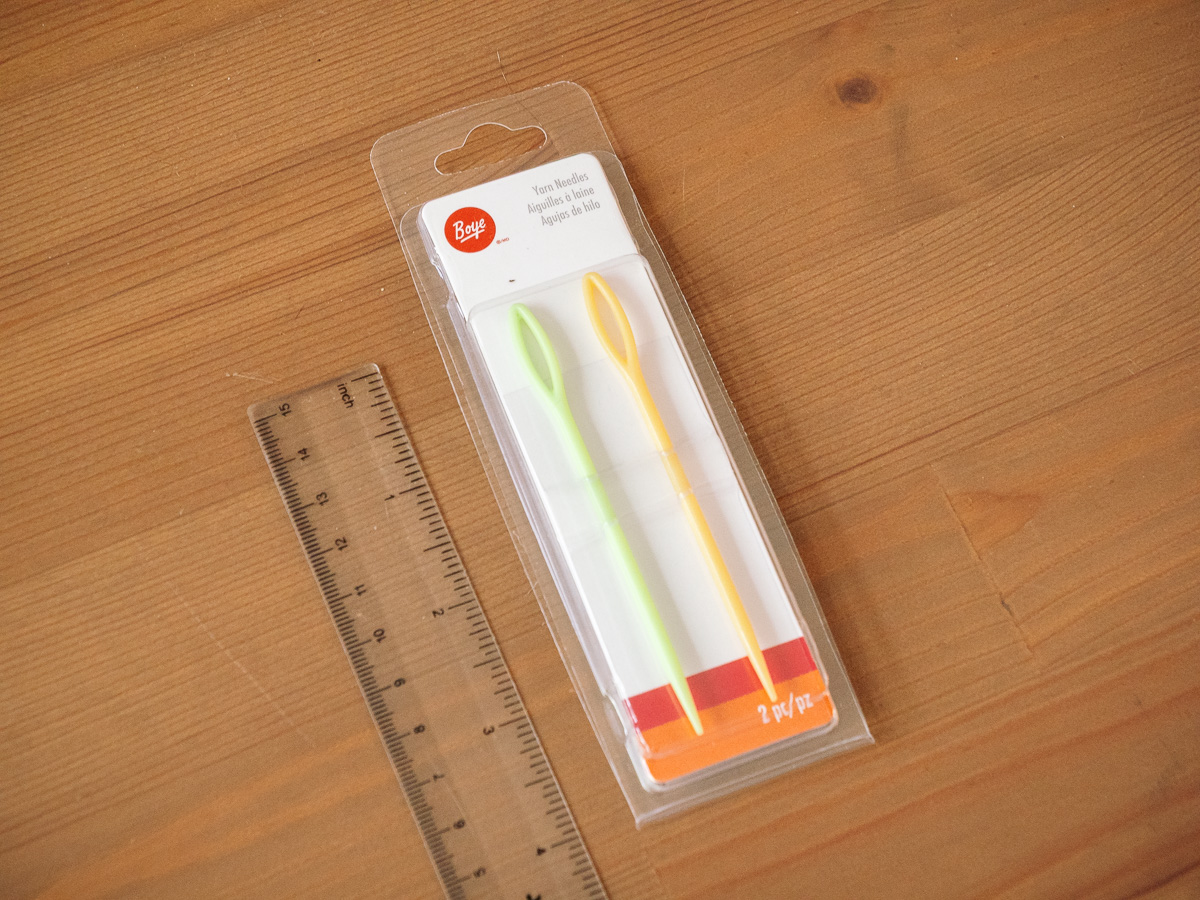
A tapestry needle is a really easy to get and cheap way to get started. And honestly… it's surprisingly effective for nalbinding even though it looks very different from a real nalbinding needle. You could use one of these to nalbind an entire piece and I don't think it would feel too bad at all.
Do not, however, attempt to use a sewing needle for nalbinding! Sewing needles are much too thin, too short, too pointy, and the eyes are far too small for the yarn you'll use. Then only thing a sewing needle will help with is stabbing yourself.
Making Your Own Needle
Another option is to make your own needle. This is a little more work, but will probably work a little bit better than a tapestry needle because it'll be closer in shape to a real nalbinding needle. For this you'll need a popsicle stick, some sandpaper, and either a drill or a knife to make the eye.
You can get sandpaper from any hardware store if you don't already have some. If you want to get a single grit then 220 grit will work for this, but I'd recommend buying a variety pack so you'll have a bunch of different grits (grit is how rough the sandpaper is, lower grit means rougher).
You can either buy some popsicle sticks from a craft store (cheap and easy, but you'll probably have to buy way more than you need) or buy some actual popsicles from a grocery store and eat one to get the stick (tasty, but you'll have to wash off the sugar). If you can't get a popsicle stick you can even start with an actual stick from a tree instead and carve it down to size with a knife.
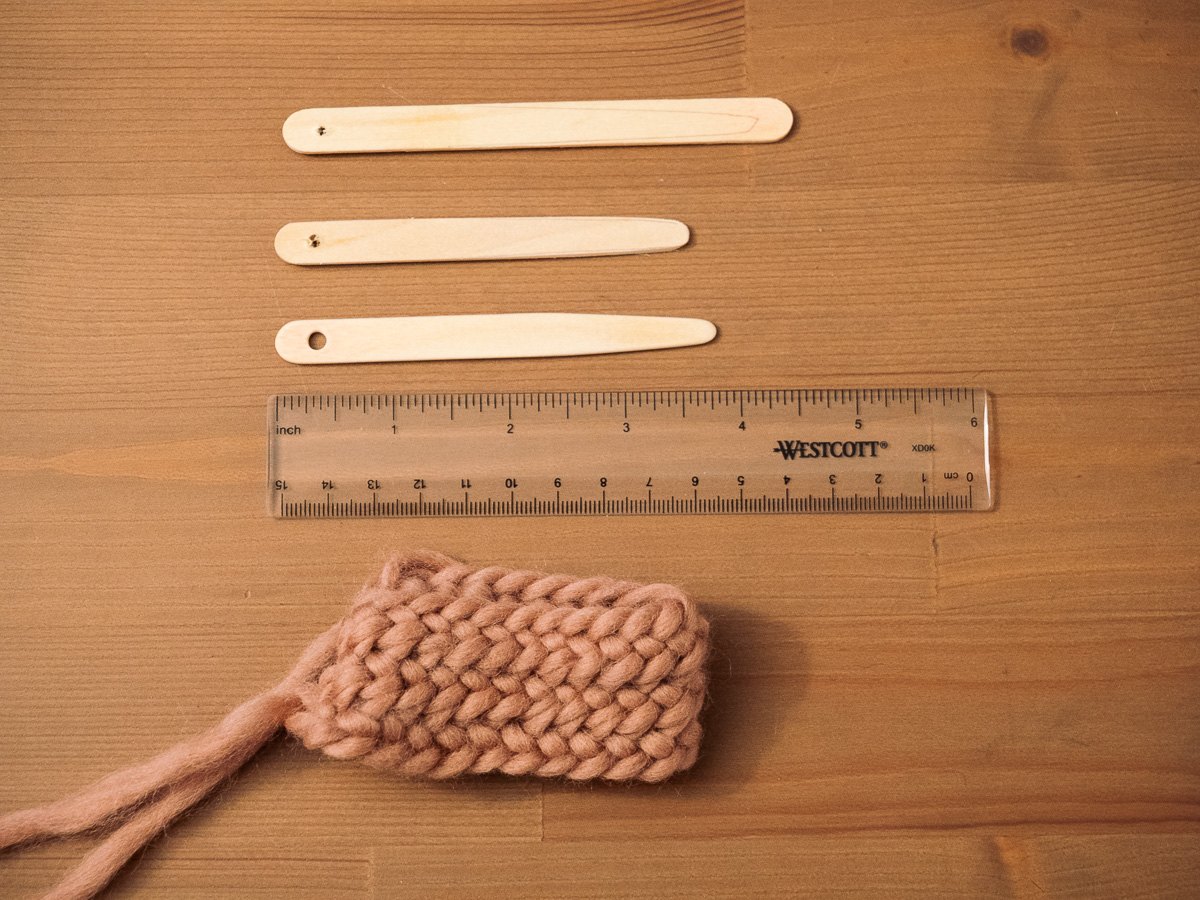
Either way, once you've got a popsicle stick you'll want to make a hole in one end with a drill or (very carefully) using a knife tip to manually drill a hole. Use some sandpaper to enlarge and smooth the hole into an eye, then trim down and shape the rest of the needle with the knife/sandpaper until it's approximately the right size and shape:
- Aim for about 3.5 inches (9 cm) long. Different people like different sized needles (I prefer longer needles myself), but you won't know what you prefer until you've learned a bit and made a few things. 3.5 inches is a good middle ground, just start there for now.
- Don't make the tip too thin and/or pointy, because that'll make it more likely to accidentally split the yarn later.
- Once you've got it shaped, use sandpaper to make sure it's smooth all over (including inside the eye!) so it won't snag the yarn.
The process should look something like this. The third one is the finished popsicle-stick nalbinding needle, which I used to make the swatch at the bottom.
Buying Yarn
Once you've got a needle, the only other physical item you need is some yarn to make something out of. Nalbinding needs pretty specific yarn, so you'll probably want to try to find a local yarn store to buy from. It's likely that the small selection at somewhere like Target won't have what you need.
You can order online, of course, but that can take longer to ship and it's harder to judge the look (and impossible to judge the feel) through a screen. I'd recommend trying to find a yarn store somewhere near you that you can physically go to so you can see and touch the yarn in person. Just search for "yarn store" on your preferred maps website, you'll probably be able to find one that's not too far away.
Unfortunately, walking into a yarn store as someone who's never had any exposure to knitting or crochet is… intimidating. I'll try to give you enough basics here to get in, find what you need to get started nalbinding, and get out without too much stress.
A unit of yarn is called a "skein" (rhymes with "stain"). Usually they'll be around 100 grams of yarn, but this can vary. Just try to get one or two skeins for now. If you end up sticking with the hobby you'll find yourself with more yarn than you know what to do with before long.
Yarn Sizing
Nalbinding generally works better with larger yarn, especially when you're first starting out. You might think that yarn sizes in the shop would be organized by something like "the diameter of the yarn in mm", but unfortunately they're probably not. Some typical yarn sizes are, in order (roughly) from thinnest to thickest:
- Lace
- Fingering
- Sock
- Sport
- DK
- Worsted
- Arran
- Chunky or Bulky
- Super Chunky or Super Bulky
- Jumbo
The classification of any particular yarn isn't based on a single number like diameter, but rather some combination of diameter, density, and overall feel. These are rough categories, and a yarn that one company calls worsted might actually be smaller than another company's arran (especially if it's denser), which is why it's very helpful to go to the store and look at the yarn in person.
When you're getting started nalbinding you'll want a relatively large yarn, preferably about the diameter of a pencil, so you can more easily see what you're doing and it'll hold itself together more securely. Start at the bulky section of the yarn store and look around from there to find one that's roughly that size.
Yarn Material
Yarn can be made of different kinds of fibers like wool, cotton, linen, silk, polyester, etc. When you first start nalbinding you'll want to get 100% wool yarn because that's the kind that will most easily join together by felting (you'll see what "felting" is in the videos below). There are ways to nalbind with other yarns by joining in different ways, but don't try to start learning on hard mode. Just trust me and get 100% wool for your first attempts.
One more thing to look out for: do not get "superwash" wool. Superwash is a process that modifies wool in several ways to make it more machine washable. One of the results is that superwash wool is harder to felt, which is why we're buying wool in the first place. If you're looking at a yarn and the fiber content on the labels says something like "superwash merino", put it back. Don't try to learn on hard mode.
Yarn Colors
Yarn comes in a lot of different colors. It will be easiest to start with a lighter-colored yarn because it'll be easier to see the individual stitches, but get a color you at least think looks halfway decent. Neon orange is easy to see but if you hate how it looks you're not going to enjoy the process of learning and be motivated to continue.
You'll also probably notice that some yarns in the store are a single color and some other yarns have many different colors mixed together, like this:
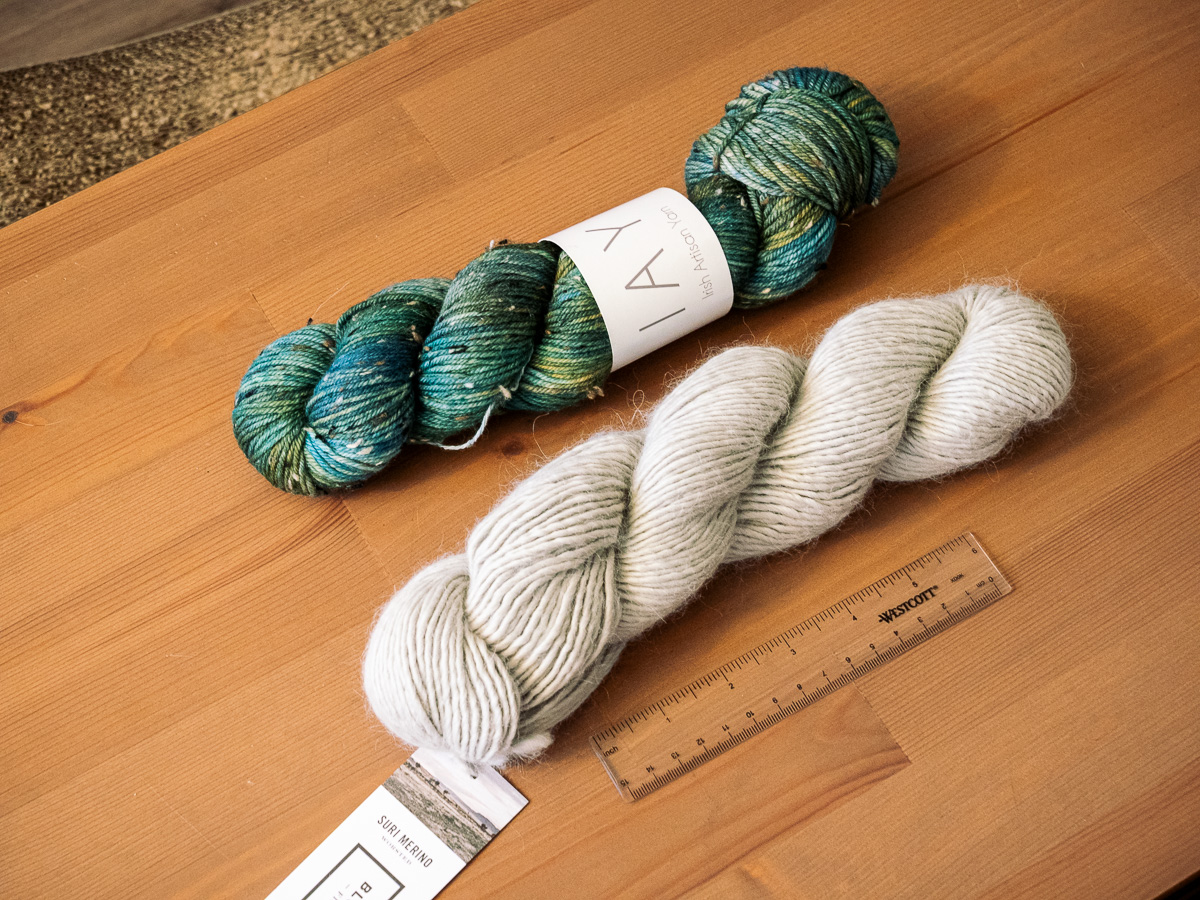
Those mixed ones like the one on the top are called variegated and are great to start with as a beginner because they'll make it even easier to see the boundaries between stitches: if two threads next to each other have different colors it's easier to tell them apart. I personally think a lot of variegated yarn tends to look a bit tacky, but there are some tasteful ones out there too. So if you see a variegated yarn that you think looks good, and it checks all the other necessary boxes, definitely go for it!
Yarn Ply
Yarns can be made of a single spun strand (called a ply), or have two or more strands (plies) twisted together to form the main body of the yarn. When you're first starting out nalbinding you'll ideally want a single-ply yarn. Multiple plies will make it more confusing when you're trying to see where your stitches are. It's not the end of the world if you have to use a 2- or 3-ply yarn (my first project used 2-ply), but try for 1-ply if possible to make your life easier.
Winding
When you finally have the yarn you're looking for and walk up to the cash register to buy it, they might ask you if you want them to wind it for you. If you're like me, you'll look down at the ball of yarn that already looks perfectly wound and say "uh, sure?".
Here's what you need to know about the whole "winding" thing. Skeins of yarn in the shop are generally going to be sitting on the shelf loosely wound, often in either a ball shape or twisted into a more horizontal hank shape:
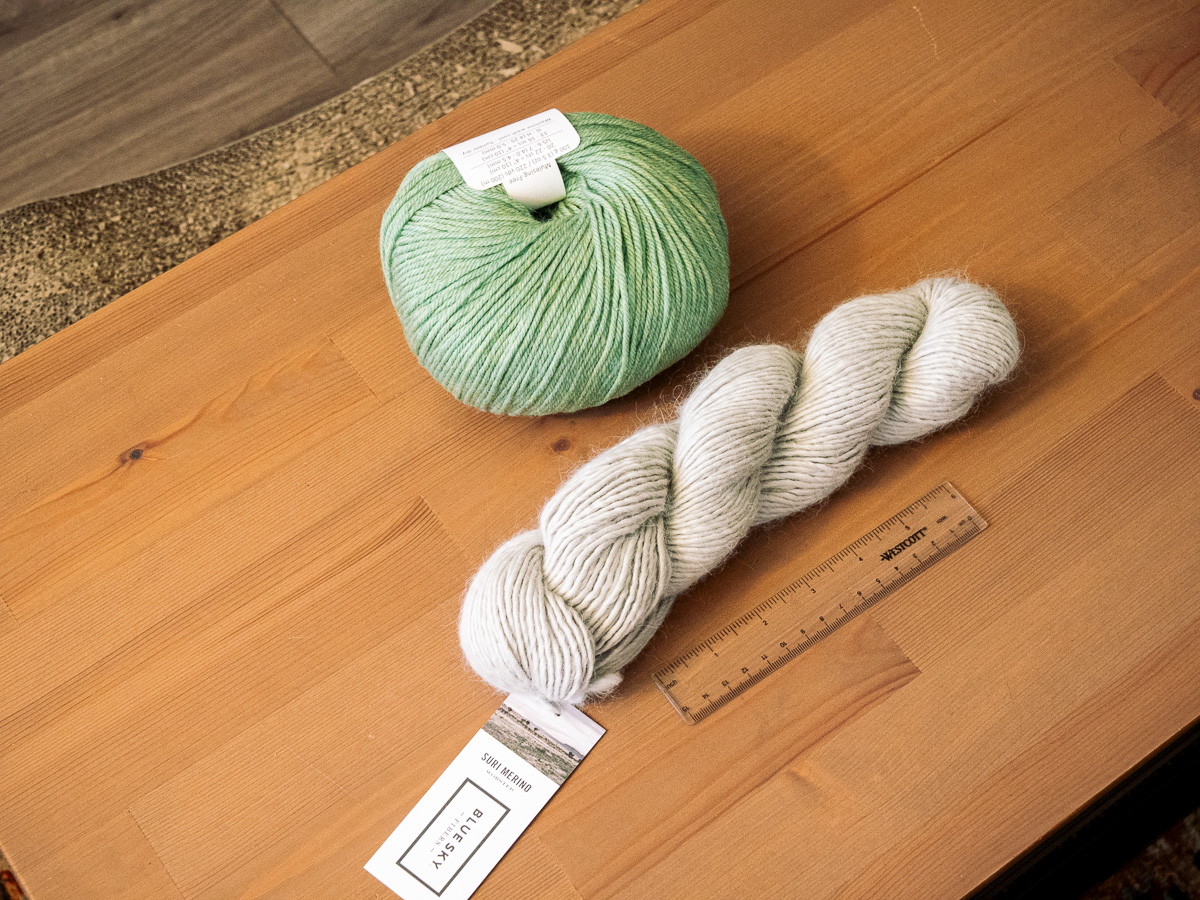
Both of these are loosely-wrapped, which is great for shipping and storage because it puts less tension on the yarn. But when you're actually going to use the yarn, you'll want to be able to grab one end and pull to cleanly drag some yarn off the skein, and this is hard to do without tangling when it's in the original loosely-packed form. When the shop winds the yarn for you, they wind it up so that it'll pull cleanly and easily off as you're working. You can (and should) learn to wind your yarn by hand yourself eventually, but they'll be able to do it for you much cleaner and faster with the machine in the store. So the general rules are:
- If you're buying yarn that you're going to just keep on hand but not going to use for a while, leave it unwound to avoid putting unnecessary stress on the fibers.
- If you're going to use it immediately, you may as well let them wind it for you.
- Once the yarn is wound you can't return it, so if you might not need it then definitely don't wind it.
Another useful thing to know: when pulling from a wound ball of yarn, you pull the end of the yarn coming from the inside of the ball, not the end on the outside. I don't know if this is supposed to be obvious, but it certainly wasn't obvious to me for my first few months until someone finally told me.
Please Just Tell Me What Yarn To Buy Already
Summing up the above, you want a yarn that satisfies (in rough order of importance):
- Fiber content: 100% non-superwash wool.
- Size: large, roughly the diameter of a pencil or a bit smaller (probably "bulky" or "super bulky").
- Ply: ideally single-ply.
- Color: A bright color you don't hate, ideally variegated if you can find one you like.
- Let them wind if for you if they ask.
Here are some actual examples that I've used and would say would be good for a beginner:
Other Useful Tidbits
A small cup of water will come in handy if you don't want to spit in your hands to join lengths of yarn together later.
If you have some safety pins, those will also come in handy when you want to mark places in your work. Be careful: yarn shops will sell "stitch markers" which sound like a thing that would be perfect for this, but there are two kinds of stitch markers and only one of them will actually work for nalbinding:
- The kind that open and close, which are basically just smaller safety pins. These are great, feel free to buy a pack if you want.
- The kind that are just a fixed circle and do not open or close. These do not work for nalbinding, they're for knitting. Do not buy these.
How to Learn
At this point you should have:
- A needle
- A skein of yarn or two
- (Optional) safety pins for marking stitches
- (Optional if you don't mind being gross) a cup of water to avoid needing to spit on your hands
One of the first nalbinding videos I found useful is this tutorial from Valkyrja because it shows all the steps from start to finish. Watch that video, and if you want to dive right in an give it a try immediately, go ahead.
I liked that tutorial to get an overview of how the process was supposed to work, but I had a few difficulties following it:
- The dark-colored yarn and wide-angle view make it a little hard to see what's going on.
- The beginning figure-eight loop is fast if you know how to do it, but is really tricky to get the hang of (at least for me). I still don't use this method of starting.
- The initial chain she creates is very clean, because she's experienced. Your first attempt is probably going to look like a slinky that went through a washing machine. There are some things you can do to make it cleaner, which will make the whole process easier.
I spent a lot of time watching nalbinding videos by various people, and none of them really clicked with my brain until I found Happy Needlebinding on YouTube. His videos are a joy because they break things down clearly, simply, slowly, and (importantly for me) he doesn't assume you already know how to knit or crochet. Scroll through his catalog of videos (the basic tutorials are some of the oldest videos) and watch a few and I think you'll find them very helpful. There were a few things in particular from his videos that really helped take me from "this is a struggle, I don't know if I'm going to be able to do this" to "wow, this hobby is actually kind of fun and relaxing".
First was how he starts his work by using a single overhand knot as a loop and then builds the extra loops he needs to start one at a time, instead of using the figure-eight trick to do everything in one fast (but inscrutable) step. This is a little slower, but you only have to start each piece once, so compared to the total time you spend making something it really doesn't matter, and I find it much easier to keep track of each loop when I make them one by one.
As he's starting out the first few loops, you'll see him tidy up the back of the chain after he does every stitch. You technically don't really have to do this because it'll eventually work itself out once you start joining onto it (and with enough practice). But when you're first starting out, even getting to a point of having enough clean stitches to continue with is a struggle, so tidying up as you make each stitch really helps keep things clean and legible. If you're finding your initial chains are looking rough, maybe give this a try.
Also note how he uses his thumb, index, and middle finger of his left hand to manage the needle. He explains this in one of his videos and on his website where he shows how he uses those three fingers to guide the needle like a drill holding onto a drill bit, and that one analogy was what suddenly made the whole process feel comfortable to me instead of a struggle. After watching so many tutorials where someone guided the needle with two fingers (never explaining why) and feeling like I was having to squeeze the needle tightly to keep control, trying the three-finger drill-bit approach was incredibly helpful and relaxing. I can nalbind for an hour or more at a time and my hands don't ache at the end when I hold the needle like this.
Stitches
If you start searching around online for nalbinding resources you'll quickly discover that there are many, many, many different stitches you can use. It's easy to get choice paralysis and not know what to try, or to think you always need to be trying a new stitch.
The simplest stitch that most nalbinding tutorials use is Oslo stitch, or "1+1 F1" (you'll learn the notation later). If you start looking into the history of nalbinding and the artifacts that have been found you'll probably notice that a suspiciously high number of them happen to use Oslo stitch too. So for your first few projects, just use Oslo stitch. It's simple and effective and works great. You can try other stitches later, but just start with Oslo and don't worry about it for now.
What to Make
You'll want to start by making a few chains of 20-30 stitches just to get the general motion into your hands. These are going to look like hell, but that's okay, just try to perform all the steps slowly and cleanly until they start to feel a little less weird. Put them in a box and look at them in a year to see how far you've come.
After that, my main piece of advice is this:
Make one thing that you actually want.
There are two important points here:
- Make something you actually want, so you have motivation to do it.
- Make one single thing.
Many nalbinding tutorials violate this advice by using something like a pair of handwarmers as a first nalbinding project. Handwarmers lend themselves well to nalbinding because they have a simple, cylindrical structure, but they were never great for me because they violate both points of my advice:
- I never wear handwarmers, and if I made a pair I would never wear them, so I had no motivation to make them.
- Handwarmers come in pairs, which means that once you make the first one you now need to make a second one, identical to the first if you want it to look decent. Making two identical items is a skill of its own that you can and should learn at some point, but don't start learning on hard mode.
So for your first project, pick something that works as a single object and that you actually want (or, if it's a gift, that the recipient actually wants). I'll show some examples of things I've made next, but something like a simple hat or a small scarf might be good places to start.
Examples of Things I've Made
Here are a few of the things I've made so far. If you have questions or want more details about any of them feel free to let me know!
Hats
The first two full projects I made were two hats for my partner. I used Oslo stitch 1+1 F1 for the first one, with (in hindsight) some relatively small thread in a single color:

For the second hat I used 1+1 F2 with some chunkier thread, splicing in a different color every time I had to join to make a more colorful hat:

Some time later I made another hat (this one for myself) to match the scarf you'll see shortly:

Scarves
So far I've made two scarves. The first scarf was inspired by (well, let's be honest, copied from) this scarf on Ravelry. I used the same wool (Woolstok Worsted), layout, and stitch (Dalarna) as they did. The result has a few mistakes, but it turned out well enough to wear and I'm pretty happy with it.

The other scarf I've made was inspired by my trip home for the holidays last year, when I drove through central Pennsylvania. The fir trees along the side of the road were covered in snow and it was quite beautiful, so I wanted to make a scarf whose colors remind me of snow-covered fir trees. I used Dalarna stitch again, this time with Woolstok Tweed wool.

I love the wool, but the result is a little chunky for my taste (especially when folded in half to wear as a typical men's scarf). I'll have to experiment a bit more here.
Kobo Case
I recently replaced my aging Kindle with a Kobo eReader. I wanted a case to protect it when I slip it into my backpack/carry on bag, so I used some chunky yarn to nalbind one that fits it perfectly:

(Side note: I've been very happy with the Kobo, give them a look if you're in the market for a Kindle replacement.)
Snake
The most complicated thing I've made is probably this stuffed snake for my partner. She has an albino corn snake (appropriately named "Popcorn") as a pet, so I wanted to make her a stuffed version as a gift:

I used Lopi Alafosslopi wool for this, but in hindsight a thicker yarn would have worked even better. I used Dalarna stitch to make the outside smooth, with the ridges on the inside where you can't see them. It's stuffed with a combination of glass aquarium beads (for weight), linen scraps, and stuffing from the craft store.
I used the two-needle method to make the yellow spots. This worked great when the yellow yarn was in front, but unfortunately the thinness of the yarn meant that when the white yarn was in front you could see bits of the yellow through the fabric. So what I ended up doing was just cutting the yellow off after each section was done and leaving the ends of the yellow yarn dangling inside, which isn't a problem since it's a closed shape. I think I'll need to get some more practice with the two-needle color work method before I make something where both sides are exposed.
Going Further
Once you've made one or two small things and have the basic motion in your hands, the nalbinding world is your oyster. There's lots of different directions you can go and lots of things to learn.
Working with Yarn
Yarn, especially wool yarn, is a really interesting material. I found a video on YouTube called The Insane Geometry of Your Clothes that was really helpful to me in understanding it a little better, especially the animation starting at 2:12 where he explains why yarn gets stronger when it's spun or twisted.
Before I saw this video I had seen many nalbinding videos where the person would say "break the new piece of yarn off of the skein", but sometimes I would find it very hard to tear a piece of yarn off of the ball and I didn't know why. Watching that video (specifically the part starting at 2:12) makes the solution to my problem clear: if you untwist the yarn first it turns the helix of strands (stronger) into parallel strands (weaker), making it easier to break.
A Nicer Needle
If you decide you like nalbinding and want to do it more, you'll probably want to get a more suitable needle for yourself. You can find people selling nalbinding needles on Etsy. I've bought a few needles from Lykos Leather and Snyder Spindles on Etsy and have been happy with them for the price. For the price of one skein of yarn you can easily get one or two bone, horn, or wood needles of different lengths and experiment to see what you prefer.
It's worth noting that when you buy a nalbinding needle from a shop on Etsy for a pretty cheap price (in the $10 range) it will come in a state that's maybe a little rougher than you expect. It might not be perfectly symmetrical, there may be some rough edges (especially inside the eye), and so on. I think this is pretty reasonable for a $10 purchase, and it gives you an opportunity to customize your needle a bit yourself. Creating and modifying my own tools is one the joys of crafting for me (which explains why I love programming so much), so I had a fun couple of evenings turning some basic needles into needles that are mine and are just how I like them. Just remember to wear a mask when you're sanding, especially if your needle is bone or horn — you probably don't want to be breathing in bone dust.
One helpful resource for this was this video from Valhalla Ironworks about making a nalbinding needle from scratch, specifically the parts where he explains why there's a notch in the back of the needle (to provide extra relief for the folded yarn). Both of my favorite needles have this relief notch in the back, which I added using sandpaper wrapped around a small metal rod. It's a small thing, but it really does help the yarn glide more smoothly through the loops (especially thicker yarn) and it makes them feel like mine.
Other Helpful Things
While a needle and yarn is all you really need for nalbinding, there are a few other little inexpensive things you can pick up that will provide some easy quality-of-life improvements. Here are a few that I've found useful.
I picked up a small spray bottle for the water I use for felting. This is quick and easy to use (2-3 sprays on the ends is enough to felt them nicely) and it's easy to carry around without worrying that it'll leak.

When felting the ends together to join them, all the tutorials will say to "play with the ends a bit" or "tease the ends apart" to fray them, so the fibers of both strands can intermingle better. I find this difficult for some yarns, probably because I keep my fingernails very short. My partner saw this and got me a little metal comb that's designed to be a hair brush cleaner, but works great for combing apart the ends of yarn. It does pull out some of the strands in the process, but that's actually a good thing: you want the ends to be a little thinner than the actual yarn because you overlap them to felt them, so if they're full thickness the felt point will be a thicker bump in the finished work. The comb works great, and it's tiny and really easy to carry around.

When shaping things with nalbinding you'll need to increase or decrease after a certain number of stitches (e.g. "do 6 normal stitches and then increase"). Eventually you'll be able to do stitches fast enough that you can just count them out without getting lost, but when I was first learning I often struggled with individual stitches enough that I would lose count of how many I had done since the last increase. I solved this by adding a 12-sided die (called a "d12" by D&D players) to my nalbinding kit, so I could put it on the table and rotate the number every stitch, moving it back to 1 after the increase. You can get a d12 at any local tabletop game store (though if you're reading this blog I bet the odds are pretty high that there's already one in your house somewhere). A d20 would work just as well, I've just never needed to count that high when nalbinding yet.
As I mentioned earlier you can use standard safety pins for stitch markers, but you can also buy slightly more compact ones in a yarn shop. I keep a little pill case that has a few of them and my d12 in my kit.

Most nalbinding tutorials will tell you to tear or break lengths of yarn off the ball instead of cutting it cleanly, which will help it felt better. But if you have the little comb I mentioned earlier you don't really need to do that, and some yarn is kind of hard to tear even when you know the secret of untwisting it. I got this little yarn cutter thing from my local yarn store which works great and is small and safe to carry (the blades are very well shielded by the metal fob). Alternatively you could get a pair of embroidery shears, which are often in the shape of a pretty bird, but are a little bulkier and are more likely to raise questions if you try to carry them on a plane.

When you finish a project you'll want to weave the final end of the yarn back into the nalbinding so it doesn't hang loose. I picked up a cheap little crochet hook for a couple of bucks which I've found helpful for pulling the yarn back through the loops.

And finally, once you've gotten a bunch of these little things you'll want some kind of bag to hold them all in. I use a pencil bag, but anything that makes you happy will work!
Stitches
Once you've done a few projects you'll probably be itching to try one of these other stitches you've heard about. Give it a shot and experiment! I personally love the Dalarna stitch because of how asymmetrical the sides are: all the excess bulk of the yarn is shunted off to one side, leaving the other side very flat. I really like it for scarves, because when you fold the scarf in half to wear it with the ridges on the inside they interlock and hold the scarf together really well.
If you haven't already, when you start searching for nalbinding resources on the internet you'll almost certainly run into Neulakintaat, which is probably the most extensive nalbinding resource around. Once you're comfortable with the basics of nalbinding and doing Oslo stitch fluently, check out her videos to see how to do many, many more kinds of stitch. I found those videos difficult to understand as a complete beginner, but now that I've learned more I find myself turning to them if I need to remember how to do a particular stitch or want to quickly see how a new stitch is done.
Multiple Colors
Working with a single color of yarn is fine, but before long you'll probably be wanting to incorporate multiple colors into the things you make. There are a couple of ways you can do this, some of which are more complex than others.
If you're making an object with multiple rows (like the scarves I showed above) you can simply use a different color of yarn for different rows. I find it helpful to plan out the rows in advance using a spreadsheet, but you can also just wing it if you want. I generally try to either make something perfectly symmetrical or avoid repetition altogether, but experiment and see what works for you.
You can also add multiple colors to a piece by swapping yarns when you splice in a new length. Happy Needlebinding's videos show many great examples of this style, and the second hat I showed uses this technique. It can take a little bit of planning when you tear off a new length of yarn to try to avoid creating large rivers of color in the work, but with some practice you'll get the hang of it.
You might be wondering if you can do something like the fancy colorwork you see in knitted things like sweaters, to create more complicated designs than the basic "a new color starts where the old length ran out". The short answer is yes, but the results will probably not be as detailed as you could have achieved with knitting. You can use multiple needles at once to keep separate colored threads running and swap between them to bring a particular color to the foreground as you go. I used this technique to make the yellow rings in the snake I showed earlier, and found this video and this video useful when I was figuring out how to do it. It's not quite as detailed as you can get with the fine yarn and needles you would use for knitting, but you can still make pretty things with it, and it's really fun once you get the hang of it, so give it a try!
Communities
Before I go, I wanted to point you at some of the communities I've found online for Nalbinding. These days nalbinding is mostly a small, weird hobby, but one of the dreams of the early internet was to allow people with small, weird hobbies to find each other. Despite the direction the internet has taken in the past decade or two that dream still hasn't been completely stamped out, and there are a couple of places to find other nalbinders online.
The most popular place to talk about nalbinding online these days is probably a Facebook group. I'm sure you can find the nalbinding group on there if you search, but I'm not going to link it here because of I don't want to support anything related to Facebook.
As an alternative, Reddit's r/nalbinding is relatively active (and Reddit isn't as awful as Facebook (yet)). If you have a specific question, there's a decent chance you'll get an answer from a human if you post it in r/nalbinding.
Ravelry is a website for fiber art. Unfortunately
they've never added support for a nalbinding tag, so nalbinders have to mistag
their work as knitting or crochet, but there is a Nalbinders on
Ravelry group on the site
that still has occasional activity. I like scrolling through the projects in
that group for inspiration.
I've mentioned a few YouTube channels already, but searching for "nalbinding" or "needlebinding" on YouTube will give you many more.
And finally, not everything has to be contained on a social media platform. Search the web for nalbinding and you'll still find personal websites like Happy Needlebinding, Neulakintaat, Nalbound, Väkerrystä, and Shy Red Fox. The dream of the early internet is still alive and won't die unless we let it.